Thursday, March 20, 2014

Walnut Butter Pound Cake

Walnut Butter Pound Cake

Walnut Butter Pound Cake

Ingredients:
  • 120 gm self-raising flour
  • 2 eggs
  • 100 gm butter, softened at room temperature
  • 85 gm sugar
  • 50 gm walnuts

Walnut Butter Pound Cake Procedures

Method:
  1. Preheat oven to 180C (356F).
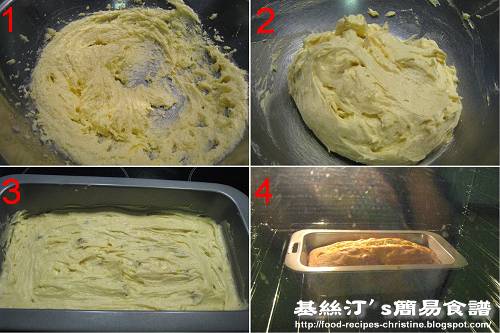
  2. Cream the butter and sugar with an electric mixer over medium speed until the mixture is smooth, fluffy and light in color (see picture 1).
  3. Whisk eggs. Stir in one-third of the egg into the butter mixture at a time. Stir and combine well between adding egg each time.
  4. Sift flour into the egg mixture. Use a spatula to combine all ingredients. Make sure to scrape the sides of the bowl and mix well (see picture 2).
  5. Grease sides of a rectangular cake mould, 11cmx21cmx6cm, or use a non-stick one to skip this step. At last, incorporate walnuts into batter. Transfer batter into mould. Bake for 35 to 40 minutes (see picture 4). Test with a needle. If it comes out clean, it’s done. Let cool on wire rack.


Friday, February 14, 2014

Prawn Crackers

Prawn Crackers


Ingredients:


2 lbs peeled and deveined prawns

2 lbs tapioca starch

4 1/2 tsp salt

4 tsp sugar

2 tsp pepper

1 tsp msg (optional)


Use kitchen towel to dry the prawns.


Put prawn into food processor and process until it becomes a paste.


Add in salt, sugar, pepper and msg
Add in tapioca starch


Transfer to a big bowl and mix in all the tapioca starch until well combined


Transfer to the stand mixer and using the dough hook, knead mixture until very smooth


Roll paste in 1 1/2 inch logs which weighed 8 ozs each log and place in a greased plate.


Cover with a piece of foil which has been greased to prevent paste from sticking to it.
In a pressure cooker, put in 1 inch of water and place a stand to raise the plate above the water. Put the covered plate in and pressurized for 30 minutes.


Logs of prawn paste should be cooked through. Let them cool before wrapping in foil and leave in the freezer to harden, to fasilitate slicing.
Use a sharp knife and cut into very thin slices.
Put the slices in the food dehydrator and dry the slices. Friends in the tropics can sun dry the slices. Friends in Denver, you don't even need the dehydrator, just leave the slices on the cake rack and let it dry at room temp.
Heat enough oil for deep-frying. when oil is hot - 350 f - drop a few pieces of dried crackers and watch them expand. Dish out as soon as they have expanded. Do not overbrown them. Use a spider ladle to aid removing crackers from hot oil.

Char Siew


Char Siew

Char Siew is worth making in multiple quantity of this recipe as it can be kept in the freezer for so many other recipes. It can be an appetizer, entree, filling and accompaniment to noodles and rice.
Image hosted by Photobucket.comImage hosted by Photobucket.com


Ingredients:

500g pork - cut into 2 inches strips and score the strips(belly pork or marbled)

Seasonings:

2½ tbsp Hoisin sauce
1 tsp garlic powder
2 tsp soy sauce
1/4 -1/2 cup sugar
1 tbsp wine - Mui Kai Lo
1/2 tsp 5 spice powder
1/4 tsp salt
Dash of pepper

Glaze:

1 tbsp dark soya sauce
1 tbsp honey or maltose
1 tbsp oil


Method:

Marinade pork with seasonings for 2 hours.(optional). Pork can be baked as soon as it is marinated.

Line a baking tray or stainless steel dish with aluminium foil. Transfer marinated pork on to it and cover with foil.

Bake char siew at 220 C/425 F for about 10 minutes.

Remove from oven. Open the top foil and bake again until gravy thickens and coat the pork.

Alternatively, cook pork together with the marinade in a wok until the gravy thickens. Stir occasionally to prevent burning.

Preheat grill and grill the pork until it is charred(not burnt), turning all the time for even grilling.

Dip into glaze and return pork to grill just for a short while, enough to give pork a shine.

Monday, February 10, 2014

Asian Bread Buns

My first attempt at making soft fluffy Asian bread buns
Recipe: Dough to make 8 soft fluffy Asian bread buns
Machine used: Breville the Custom Loaf Pro BBM800
Settings: Dough + Start
Paddle: Collapsible

Ingredients:
120gm of TangZhong (Water -- 125ml & Bread Flour -- 25gm)
Full cream milk, scalded and cooled -- 125ml
Salt -- 1 teaspoon/5gm
Caster Sugar (Granulated Sugar) -- 4 tablespoons/55gm
Bread flour -- 2.5 cups/350gm
Milk Powder -- 1 tablespoon/ 7gm (Optional)
Large Egg -- 1 each
Tandaco yeast -- 2 teaspoons

Directions:
1. Prepare 120gm of TangZhong (water and bread flour)
2. Over low heat stir until line appears in mixture or when mixture reaches 65 degrees Celcius.
3. Place 120gm of TangZhong in a bowl and cover with cling wrap and leave to cool.
4. Remove the bread pan and install the collapsible paddle.
5. Place and pile up all ingredients in same order (Milk, TangZhing, salt, caster sugar, bread flour, milk powder, egg and tandaco yeast).
6. Wipe the outside of the pan to remove any spillage.
7. Return bread pan into the bread machine.
8. Close the lid.
9. Choose settings (dough) and press start.
10. Wait for machine to finish all cycles and remove the dough and place on a floured work station.
11. Deflate dough and divide in 8 portions then roll into balls
12. Cling wrap or use a moist towel and leave to rise for 15 minutes
13. Check part 2 for the steps to bake the buns. Link coming up soon.

Sunday, February 9, 2014

Yoghurt + Condensed Milk + Cream + Grapefruit = Grapefruit Yoghurt Ice Cream

Yoghurt + Condensed Milk + Cream + Grapefruit = Grapefruit Yoghurt Ice Cream


IMG_4083
Besides simple ingredients and simple steps, what amazed me is the relatively small amount of creams used and instead it was mostly substituted by yoghurt and condensed milk. Based on these ingredients, I would think that this ice-cream is relatively healthier than the others whereby it was packed with double creams. It utilized only 200 ml of heavy cream and the final ice cream is about 800 g therefore representing about 25% of the total volume.


WHAT IS REQUIRED
IMG_3886
  • 200 ml of double cream

  • 200 ml of natural yoghurt

  • 1 tin (about 385 g) of condensed milk or sweeten beverage creamer.

  • 300 g of grapefruit flesh. (The grapefruit flesh can be substituted with orange flesh if you desired)
Note that you have to ensure only the flesh are free of any white dividing tissues between the grapefruit globes and white sponge liked tissues near the skin. Only flesh shall be used. Otherwise, your ice cream will be very bitter.
IMG_4081


STEPS OF PREPARATION
IMG_3894
  • In a big mixing bowl, put yoghurt, condensed milk and heavy cream. Beat until well combine and smooth.

  • Add in grapefruit flesh and continue to “beat” using slowest speed until well combined. “Beat” here is just a simple mixing action. It is good to use the mixer to do this mixing because it will help you “separate” the grapefruit fleshes. In addition, if your grapefruit have the white dividing tissues, it may stuck to the egg beater and you can easily pick it up.
IMG_3900
  • Transfer to a plastic container and freeze overnight in the freezer. (Note: Possibly because of the hot weather in Singapore, I can’t follow the original recipe of freezing 3 –4 hours. I have to freeze overnight before it can be hardened).
IMG_4080
CONCLUSION
This recipe is definitely my choice of making future ice creams. I will try with other fruits and colour combination. What comes into my mind now will be kiwi fruit, durian, strawberries, custard apples or even papayas..If I do not want the plain yoghurt, I can used some ready made yoghurt such as mango yoghurt with mango flesh! For me, I believed it is definitely a healthier choice.

Saturday, February 1, 2014

Japanese Cotton Cheese Cake

Japanese Cotton Cheese Cake- Minimize Shrinkage

Soufflé cheesecake is the Japanese take on cheesecake. It's much lighter than the American or German version and not at all cheesy – the ideal cheesecake for cheesecake haters. The recipe I'm sharing is adapted from Diana's Desserts. I've made four changes to the original recipe:

The amount of cream cheese is reduced by about 30% to make the cake really light.
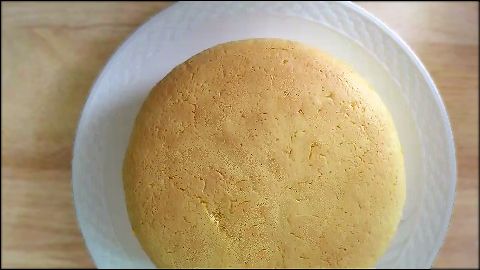
The oven is preheated to 180°C, then reduced to 170°C when the baking starts. The original recipe uses 160°C instead.

Despite the higher temperature and lesser cream cheese, my baking time is about the same as Diana's.

The cake is baked in the bottom instead of the middle of the oven so that the top doesn't brown too quickly.
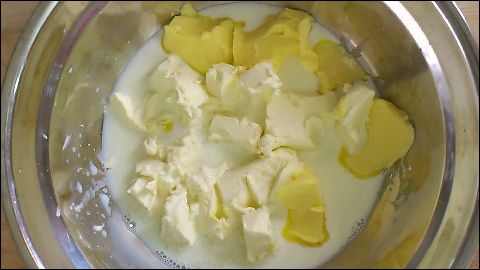
The egg whites are whisked without cream of tartar. I find the cake too sour with the original recipe's ¼ tsp, and the acid isn't necessary for stopping the cake from collapsing.

Besides the above changes, I've added a couple of steps to make the cake as smooth as possible: sieving the cream cheese mixture; and removing big air bubbles in the batter by banging the mixing bowl hard, and by pouring slowly when the batter is transferred into the cake pan.

The inside of a good soufflé cheesecake should have lots of tiny holes, like a chiffon cake, to make it light. Big holes would be unsightly; no holes at all would mean the cake is heavy and dense like a regular cheesecake
JAPANESE SOUFFLÉ CHEESECAKE
Source: adapted from Diana's Desserts
(Recipe for one 18 cm cake)

80 ml milk
40 g butter, at (tropical) room temperature, cut into small pieces
140 g full-fat cream cheese block, at (tropical) room temperature, cut into small pieces
50 g cake flour, sifted
15 g cornstarch, sifted
⅛ tsp salt
mix evenly with sifted cake flour and cornstarch
75 g egg yolks
2 tsp lemon juice

180 g egg whites
90 g caster sugar

Measure and prep ingredients as detailed above.

Preheat oven to 180°C (355°F). Put kettle on. Line 18 x 6 cm round cake pan, with parchment paper extending above top of pan by 2-3 cm.
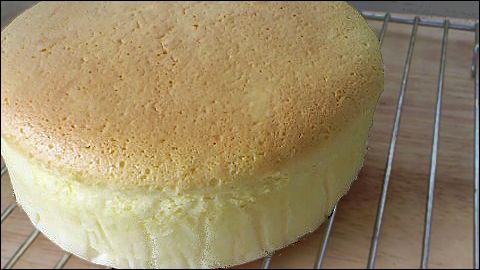
Heat milk till hand-hot. Add to butter and cream cheese. Mix evenly. Add egg yolks and lemon juice. Mix evenly. Sieve, twice so that mixture is silky smooth. Add cake flour, cornstarch and salt. Mix till just even.

Whisk egg whites till big bubbles become small. Continue whisking whilst adding sugar gradually. Keep on whisking till egg whites form soft peaks.

Add egg whites to yolk mixture in 3 batches. Mix till half even after each of first 2 additions, then till just fully even after third addition. Bang mixing bowl against worktop 3-4 times, hard, to remove big air bubbles.
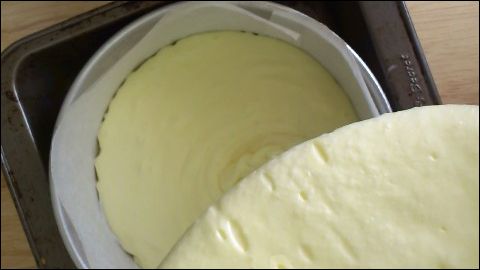
Pour batter into cake pan, slowly so that big air bubbles burst as batter flows out of mixing bowl.

Reboil water in kettle. Put cake pan in a bigger pan. Fill outer pan with boiling water to about half-way up sides of inner cake pan. Reduce oven temperature to 170°C (340°F). Bake in bottom of oven till top of cake is golden brown and inserted skewer comes out with some crumbs attached, about 1¼ hours.

Remove cake from oven. Leave on wire rack to cool down completely. Unmould by inverting onto a plate. Discard parchment paper. Invert onto another plate so that cake is right way up. Cut with serrated knife by moving blade either forward or backward, i.e. do not saw.

鸡蛋糕糕

WHAT IS REQUIRED?
Recipe adapted from : Xinshipu.
IMG_3092
  • 2 large eggs (preferably at room temperature) (鸡蛋)

  • 300 grams of self raising flours – sifted (自发面粉)

  • 150 gram of fine sugar (细砂糖)

  • Sprite or 7-up or ice cream soda about 200ml (汽水)

  • 2 tablespoons of condensed milk (炼奶) or 2 teaspoons or ovallete

  • One 6” bamboo basket (竹篮) that are 4” deep or round baking tin (烤盘)
Note:
It is rather common in Malaysia and Singapore or even the original recipe uses ovallete. As I do not have ovallete with me, I have searched for ovallete substitute and I came across this blog http://www.thelittleteochew.com/2009/09/what-is-ovalette.html which have list out his/her preference of not using ovalette. I tends to concur with her that as long as the egg is adequately beaten, there is no need to have ovallete or condensed milk. My mother in law also disclosed to me that they have never used any ovallete in her many years of making this cake.

STEPS OF PREPARATION
Pre-preparation
  • Get ready a 6 inches diameter baking tin and lined it with baking paper. Ideally, use a bamboo basket and lined with cellophane plastic sheet (竹篮玻璃纸). As I do not have the bamboo basket, I used a baking tin instead. Baking tin are more difficult to steam.

  • Get ready a big pot or wok for steaming and make sure that the cover is tall enough for your cake rise. One of the reasons that this cake as in the illustration did not rise as high as desired because it was constrained by the height of my steamer.

  • Boiled the water under high heat and put the empty baking tin in the steamer to warm the baking tin.

Making the cakes
IMG_3093
  • Crack two eggs in a big mixing bowl. Add the sugar and 2 tablespoons of condensed milks or 2 teaspoons of ovalette.

  • Beat at high speed until the eggs turns light and fluffy. (Note that as a result of adding condensed milks, you may not be able to obtain the soft peak form from egg beating).

  • Fold in the sifted flour as quickly as possible.

  • Add in the gassy drinks and, stir lightly and quickly until well mixed.

  • Transfer the batter quickly to the heated baking tin/wooden basket. Put some some sugar on top of the batter in a cross shape (this is an important step to make it crack). 在鸡蛋面糊上面上,跟着十字的形状,撒下2条直线的白糖。
IMG_3058

  • Steamed under high heat for about 25-30 minutes or until a skewer inserted in and comes out clean. Put in additional hot water if the water dries up. Do not open the steamer cover for the first 15 minutes.

  • Once your remove the cake from the steamer, immediately remove it from the baking tin or bamboo basket. Place in a wiring rack and let it cool completely. It is important that you took out the baking tin or bamboo basket immediately to prevent water condensation around the side of the baking tin that will make the cake become soggy.
IMG_3094
  • Cut into pieces before serving. Re-steamed the cake before serving if you find the cake hardens after two to three days.
I have purposely to decorate this cake with a red ribbon and some red colouring on top of the cake. This is the traditional way of decorating the cake before offering sessions.
IMG_3097
Analysis On Textures of The Cake
The texture of the cake is slightly different from the traditional cake due to the addition of gassy drinks and condensed milk. It is moister and I do not even need to have some drinks after taking three to four pieces. Traditionally, as it is very light and fluffy, I tend to get choke as the cake debris will irritate my throats. Therefore, do not compare with the traditional cake texture. So far, family members preferred this newer texture than the traditional types as it is easy to eat!
IMG_3105

CONCLUSIONS
This is a simple cake. This is a traditional cake that not many blog writers would want to write about. However, to make it to “laugh” or crack to the way that you desired, it needs delicate handlings. As a traditional old man, I respect the cake and give the cake full attention and the cake is happy to give me back a big smile… Haha.
IMG_3107
Have a nice day and hope that this post will help those readers who are seeking for Chinese steamed sponge cake recipe.
Hope you like the post. Cheers
IMG_3098