Friday, October 20, 2017

SOY SAUCE CHICKEN


SOY SAUCE CHICKEN

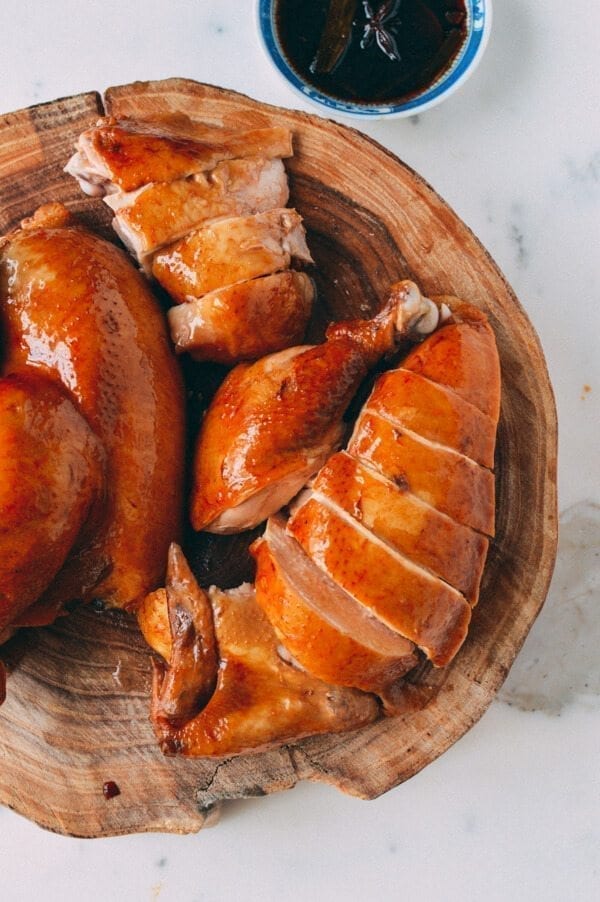
Soy Sauce Chicken, by thewoksoflife.com
Soy Sauce Chicken or “See Yao Gai” is a quintessential Cantonese favorite, found hanging under heat lamps in many Chinatown restaurant windows. You’ll find it near the poached chickens, roast ducks, and roast pork. All have their merits, but a Soy Sauce Chicken done right is tough to beat.
It’s Judy’s favorite food to pick up when in Chinatown, and there is just something about the flavor of this chicken that makes it so satisfying and tasty each time we get it. These days, a 4 to 5 pound soy sauce chicken runs about 23 bucks, which is totally worth it, but also more reason to make it at home.
The cooking method for soy sauce chicken is similar to the one used in our Cantonese Poached Chicken w/ Ginger Scallion Oil (bai qie ji), recipe, but the similarities end there. Stewed soy sauce, aromatics and spices are the essence of this dish. After you make it once or twice, you can feel free to adjust the amounts of sauces and spices to your own taste. It took me a few tries to get the right ratio of ingredients!
Let’s get on with the recipe.
Soy Sauce Chicken, by thewoksoflife.com
You’ll need:
1 whole chicken, about 4 pounds (preferably free-range, never frozen)
2 teaspoons oil
7 slices ginger
2 scallions, cut into 3-inch pieces and smashed flat
3 whole star anise
1 ½ cups rose-flavored rice wine (mei kwei lu) or shaoxing wine
1 ½ cups soy sauce
1 1/4 cup dark soy sauce
1 cup sugar, plus 2 tablespoons
2 teaspoons salt
10 cups water
Take your chicken out of the refrigerator an hour before you plan to cook. You’ll want it at room temperature when it hits the pot. Remove the giblets, and thoroughly rinse the chicken inside and out.
Grab your stock pot. It will ideally be a tall, narrow pot that will just fit the chicken, since it should be totally submerged in the cooking liquid (if you use a larger pot, you’ll need to increase all the ingredients proportionally to create more cooking liquid). Put it over medium low heat, and add the oil and ginger.
Soy Sauce Chicken, by thewoksoflife.com
Let the ginger caramelize for about 30 seconds. Then add the scallions and cook another 30 seconds.
Soy Sauce Chicken, by thewoksoflife.com
Add the star anise and rice wine, and bring to a simmer to let the alcohol cook off. Add the soy sauce, dark soy sauce, sugar, salt, and water. Bring to a simmer again and cook on low heat for another 20 minutes.
Soy Sauce Chicken, by thewoksoflife.com
Increase the heat to bring the liquid to a slow boil (i.e. a little stronger than a simmer, but not a rolling boil). Use a large roasting fork inserted into the chicken cavity to lower the chicken slowly into the pot breast side up. Make sure any air pockets in the cavity fill up completely with liquid. The chicken should be entirely submerged at this point.
Once the chicken goes in, the cooking liquid will cool down. Let it cook for about 5 minutes at medium high heat. Next, use your large fork to carefully lift the chicken out of the water and empty the liquid inside the cavity, which will be cooler than the liquid surrounding the chicken. Lower the chicken back into the pot, making sure once again that there aren’t any air pockets in the cavity. If the chicken is not completely submerged, periodically baste the exposed area with cooking liquid.
Bring the liquid back up to a lazy simmer, which should take about 10 minutes. Keep it at this slow simmer (the liquid will be about 210 degrees F) for 25 minutes. Turn off the heat, cover the pot, and let the chicken sit in the pot for another 15 minutes. Transfer the chicken to a cutting board. If you like, you can use a meat thermometer in the thickest part of the thigh to confirm it’s reached 165 degrees F.
Soy Sauce Chicken, by thewoksoflife.com
Use the sauce from the pot to occasionally baste the chicken and keep the skin moist as it cools. Serve over rice with some sauce from the pot!
Soy Sauce Chicken, by thewoksoflife.com
We didn’t show it here but some folks like to have this chicken with Scallion Ginger oil from our Cantonese Poached Chicken recipe but personally, I like the purity of the stewed soy sauce for this chicken,
Soy Sauce Chicken, by thewoksoflife.com
Note: You can also make this recipe with chicken leg quarters and reduce the cooking time accordingly, since they are easier to handle and faster to cook. Also, once you’re done cooking the chicken, you can actually freeze the sauce/cooking liquid for use again later (though you may have to re-season the sauce).
Soy Sauce Chicken, by thewoksoflife.com
Ingredients
  • 1 whole chicken, about 4 pounds (preferably free-range, never frozen)
  • 2 teaspoons oil
  • 7 slices ginger
  • 2 scallions, cut into 3-inch pieces and smashed flat
  • 3 whole star anise
  • 1 ½ cups rose-flavored rice wine (mei kwei lu) or shaoxing wine
  • 1 ½ cups soy sauce
  • 1¼ cup dark soy sauce
  • 1 cup sugar, plus 2 tablespoons
  • 2 teaspoons salt
  • 10 cups water

  1. Take your chicken out of the refrigerator an hour before you plan to cook. You'll want it at room temperature when it hits the pot. Remove the giblets, and thoroughly rinse the chicken inside and out.
  2. Grab your stock pot. It will ideally be a tall, narrow pot that will just fit the chicken, since it should be totally submerged in the cooking liquid (if you use a larger pot, you'll need to increase all the ingredients proportionally to create more cooking liquid). Put it over medium low heat, and add the oil and ginger.
  3. Let the ginger caramelize for about 30 seconds. Then add the scallions and cook another 30 seconds. Add the star anise and rice wine, and bring to a simmer to let the alcohol cook off. Add the soy sauce, dark soy sauce, sugar, salt, and water. Bring to a simmer again and cook on low heat for another 20 minutes.
  4. Increase the heat to bring the liquid to a slow boil (i.e. a little stronger than a simmer, but not a rolling boil). Use a large roasting fork inserted into the chicken cavity to lower the chicken slowly into the pot breast side up. Make sure any air pockets in the cavity fill up completely with liquid. The chicken should be entirely submerged at this point.
  5. Once the chicken goes in, the cooking liquid will cool down. Let it cook for about 5 minutes at medium high heat. Next, use your large fork to carefully lift the chicken out of the water and empty the liquid inside the cavity, which will be cooler than the liquid surrounding the chicken. Lower the chicken back into the pot, making sure once again that there aren't any air pockets in the cavity. If the chicken is not completely submerged, periodically baste the exposed area with cooking liquid.
  6. Bring the liquid back up to a lazy simmer, which should take about 10 minutes. Keep it at this slow simmer (the liquid will be about 210 degrees F) for 25 minutes. Turn off the heat, cover the pot, and let the chicken sit in the pot for another 15 minutes. Transfer the chicken to a cutting board. If you like, you can use a meat thermometer in the thickest part of the thigh to confirm it's reached 165 degrees F.
  7. Use the sauce from the pot to occasionally baste the chicken and keep the skin moist as it cools. Serve over rice with some sauce from the pot!
  8. Note: You can also make this recipe with chicken leg quarters and reduce the cooking time accordingly, since they are easier to handle and faster to cook. Also, once you're done cooking the chicken, you can actually freeze the sauce/cooking liquid for use again later (though you may have to re-season the sauce).

Wednesday, April 12, 2017

SOFT NO KNEAD DINNER ROLLS


SOFT NO KNEAD DINNER ROLLS

  1. The kneaded rolls stay a wee bit more moist for longer. ie. they are slightly better the next day compared to the No Knead ones. But actually, homemade bread, muffins etc, being preservative free that they are, are always best consumed fresh so I don’t see this as a major disadvantage. Neither the kneaded nor No Knead rolls are great the next day. They lose their moisture and both need to be warmed up before serving to make them moist again. It is just that with the kneaded ones you could possibly get away with not warming up (but they aren’t great), whereas the No Knead ones definitely need warming up;
  2. Kneaded rolls rise a wee bit more. Not noticeable for normal people, and you’d never say the No Knead ones aren’t soft and fluffy. They are, they really are. It’s just that the kneaded ones rise a touch more with the same amount of yeast.
These No Knead Dinner Rolls are like magic! Astonishingly easy, no stand mixer, just mix the ingredients in a bowl! www.recipetineats.com
In terms of the prep, the batter is literally a dump-and-mix job. There is a major difference in rise time compared to kneaded dough which can rise in 30 – 45 minutes for the 1st rise, then around the same for the 2nd rise after forming the rolls. For these No Knead Dinner Rolls, the dough is much wetter than kneaded dough, so it takes longer to rise. 1.5 – 2 hours, depending on how warm it is where you are. If you use my ridiculous-but-effective tip of rising the dough in your (empty! warm!) dryer, it takes 1.5 hours. 🙂 (See recipes notes for details)
You can see in these photos how different the dough is compared to traditional bread dough. It’s not knead-able, it’s way too sticky. It’s almost more like a muffin batter!
Quick little tip: To get a beautiful golden surface, the dough needs to be rolled tightly and smoothly into balls. With sticky dough, this is tough to do. So here’s my work around: Press the dough down lightly, then bundle it up like a money-bag (mmm…Thai Money Bags…). Flip it over and you have a nice smooth surface with the dough stretched tightly = smooth golden surface. 👍🏻 I demo this in the recipe video too (below recipe).
These No Knead Dinner Rolls are like magic! Astonishingly easy, no stand mixer, just mix the ingredients in a bowl! www.recipetineats.com
Awesome Make Ahead Tip! Another big bonus for these rolls: you can roll the dough into rolls then refrigerate overnight (uncooked) and bake them fresh when you’re ready to serve! It’s quite amazing actually, I wasn’t sure it would work but it does.
Easter is coming up! That’s why I decided to squeeze these in so soon after sharing Hot Cross Buns (which you can make using this No Knead technique, the recipe is in that post). I know some people think baking with yeast is daunting. But I swear to you, watch the video. See how soft and irresistible these rolls come out. And be prepared to be blown away by how easy these are to make!
SOFT NO KNEAD Dinner Rolls
Prep Time
10 mins
Cook Time
15 mins
Total Time
25 mins
 
These soft dinner rolls are like magic! Just mix the ingredients in a bowl - no kneading, no stand mixer, no special ingredients required. These are soft, fluffy and moist, nicely salted with a touch of sweet. Definitely not a "sweet" roll. Serve with meals or use for sandwiches! Watch the recipe video below to see just how easy these are to make. NOTE: Requires 3 hours rising time. This makes 12 largish rolls - about the size of a baseball.
Course: Side
Servings: 12
Calories: 255 kcal
Author: Nagi
Ingredients
Buns:
  • 1 tbsp dry yeast (Note 1)
  • 55 g / 1/4 cup caster sugar (superfine sugar), or sub with normal white sugar
  • 1/2 cup / 125 ml warm water (Note 2)
  • 1 cup / 250 ml milk, lukewarm, whole or low fat, (Note 2)
  • 600 g/ 4 cups bread flour + extra for dusting (can use all purpose / plain flour) (Note 3)
  • 1 1/2 tsp salt
  • 50 g / 3.5 tbsp unsalted butter, melted and cooled
  • 2 eggs, at room temperature, beaten with fork
Brushing:
  • 1 tbsp butter, melted
Instructions
  1. Place the yeast and 2 teaspoons of the sugar in a medium bowl, then pour in water. Leave for 5 minutes until it froths.
  2. Place flour, remaining sugar and salt in a bowl. Mix to combine.
  3. Make a well in the centre. Add remaining ingredients and pour in the yeast liquid, including all froth.
  4. Mix until combined with wooden spoon - it will be like a thick muffin batter. Not pourable, but thick and sticky.
Rise #1:
  1. Leave dough in the bowl, cover with a wet (clean) tea towel and place in a warm place (25C/77F+) to rise for around 1 1/2 - 2 hours or until almost tripled in volume. See Note 4 for how I do this (you will laugh - but it works every time!). Dough surface should be bubbly (see video or photos in post).
Forming Balls (watch video, it's helpful):
  1. Line a 31.5 x 23.5 cm / 9 x 13" tray with baking paper with overhang.
  2. Remove tea towel and punch dough to deflate, then mix briefly in the bowl to get rid of the bubbles in the dough.
  3. Dust work surface with flour, scrape dough on work surface. Dust top of dough then shape into a log. Cut log into 4 pieces, then cut each piece into 3 pieces (12 in total).
  4. Take one piece and press down with palm, then use your fingers to gather into a ball, flip (so smooth side is up) then roll the dough briefly to form a ball. This stretches the dough on one side and that's how I get a nice smooth surface on my roll.
  5. Place the ball with the smooth side up on the tray. Repeat with remaining dough. Line them up 3 x 4.
Rise # 2:
  1. Spray surface of rolls (or cling wrap) with oil (any), then place cling wrap over the tray.
  2. Return tray to warm place and leave for 30 - 45 min, until the dough has risen by about 75% (less than double in size).
  3. Partway through Rise #2, preheat oven to 200C/390F (standard) or 180C/350F (fan/convection).
  4. Bake for 15 - 18 minutes, or until the surface is a golden brown and the roll in the centre sounds hollow when tapped. The surface colour is the best test for this recipe.
  5. Remove rolls from oven. Brush with melted butter.
  6. Use overhang to lift rolls onto a cooling rack. Allow to cool to warm before serving.
Recipe Notes
1. 1 tbsp dry yeast = 9 grams 

I use Lowan Dried Instant Yeast (red tube, sold at Woolies/Coles baking aisle) which technically doesn't need to be frothed before using but there's no harm in doing it, and I do it out of habit + also because then the same steps apply to any dried yeast. 

If you are using the packets, you can just use 2 x 7 g sachets, that is 4 1/2 tsp which is slightly more than 1 tablespoon but it works just fine. Doesn't taste yeasty and makes it rise a touch more. Otherwise, measure out 1 tablespoon. 

If your yeast doesn't go frothy, sorry to say it's not active so your buns won't rise. 🙁 

To use fresh yeast (comes in a block that crumbles, not powder like dry yeast), use 27g/ 0.9 oz. You don't actually need to dissolve it in liquid like I do with the dry, but there's no harm in doing it and so for the sake of consistency, crumble it in and let stand until it foams up, same as using dry yeast. 

2. Scalding hot milk and hot water kills the yeast. I heat milk for 45 seconds on high in the microwave, and use warm tap water. The test is this: stick your finger in. If it was a bath, would it be pleasant? Good. It's not too hot or too cold! 

3. Breads are fluffier and slightly more tender if made with bread flour rather than normal flour (plain or all purpose). However, this recipe works great with normal white flour too. 

4. WARM PLACE for dough: This is what I do all year round - use my dryer. Laugh - but try it! Run the (empty) dryer for 1 - 2 minutes, then place the bowl inside. If you do that, the dough will rise in 1.5 hours. Even if it's snowing outside! 

5. SUGAR: This is not a sweet roll (I'd use 1/2 cup+ for that) but there is a touch of sweet. 1/4 cup of sugar across 12 rolls = 1 tsp per roll. You can reduce it to 2 tablespoons of sugar.

6a. MAKE AHEAD: Follow recipe up to rolling balls and cover with cling wrap. Then refrigerate for 4 hours - 24 hours, then bake!

6b. STORING: As with all homemade bread, it is best served on the day it's made. Things made using this No-Knead version doesn't keep as well as the kneaded version - dries out more. For the day after, reheating makes all the difference to make them soft and moist again - 15 sec in the microwave! These freeze great, then just defrost. To reheat batches, I pop them on a tray and cover with foil (to avoid the surface getting too crisp), then reheat at 160C/320F for 8 minutes or so. Or cut in half and toast.

7. This recipe is adapted from various no-knead bread recipes I've come across over the years. I probably first saw it on Martha Stewart or New York Times. The recipe has been tweaked and now I firmly consider this version to be "mine"! 🙂 


No Knead Dinner Rolls recipe video! No laughing at the Baby Hands – you’ll cop