Saturday, December 28, 2013

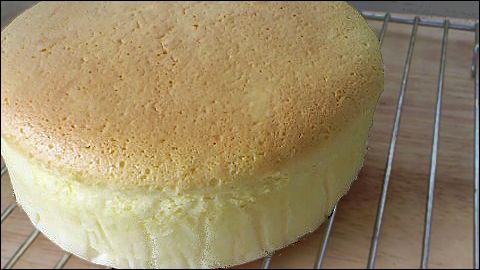
Peach Japanese Cheese Cake


Ingredients
(A)
250g Philadephia cream cheese
50g butter
100ml fresh milk

(B)
60g cake flour
20g corn flour
*sifted together

(C)
5 egg yolks
¼ tsp salt

(D)
5 egg whites
¼ tsp cream of tartar
120g fine granulated sugar

Method

Melt (A) in a double boiler. Cool the mixture. (I melt it over direct fire on low heat, stirring constantly)


Fold in (B) & (C).
Mix well.

Whisk egg white with cream of tartar until foamy. Add in the sugar gradually and whisk until medium stiff peaks form.


Fold in 1/3 of the whites into the yolk mixture using a rubber spatula till incorporated.

Pour the mixture to the remaining egg whites and fold in gently.

Fold in till incorporated.

Pour into a 8” round cake pan (line the bottom with parchment paper). I added some peaches from my leftover fruit pastry.


Bake cheese cake in a water bath at preheated oven of 160C for 15 mins, reduce temperature to 150C and bake for another 45 mins.

Turn down the temp to 140C and bake till the cake is golden brown and until skewer inserted to centre of cake comes out clean. Leave to cool in oven wih door slightly ajar.

Friday, December 27, 2013

Japanese CheeseCake

Ingredients:

(A)

140g/5 oz. fine granulated sugar
6 egg whites
1/4 tsp cream tartar

(B)
50g/2 oz. butter (I used unsalted butter)
250g/9 oz. cream cheese
100 ml/3 fluid oz. fresh milk (I used whole milk)
(C)
6 egg yolks
1 tbsp. lemon juice
60g/2 oz. cake flour /superfine flour (I used cakeflour)sieved
20g/1 oz. cornflour (cornstarch) sieved
1/4 tsp sea salt


Method:


1:Melt (B) cream cheese, butter and milk over a double boiler. Cool the mixture completely or use ice in bucket to cool it,set aside.


2:Whisk (A) egg whites at high speed until foamy . Add in the sugar and cream of tartar,then whisk again until soft peaks form and stiff.


3:Preheat oven at 350 F,prepare 2 small spring form pan or 8 inch spring foam pan ,lightly grease and line the bottom and sides of the pan with greaseproof baking paper or parchment paper.Then prepare a big deep baking dish with hot water for bain marie(water bath method)


4:Beat eggs yolk with hand whisker,then add in lemon juice,cornflour and cake flour until well mix.Mix in the (B)cheese mixture to the (C) egg yolk mixture and mix well.


5:Fold in (A) eggs white (meringue)1/3 into (B+C) cheese and yolk mixture well.Then fold in the rest of eggs white , mix well.


6:Use an aluminum foil to wrap the spring foam pan outside,to prevent bath water from going in the mixture when baking.Reduce heat to 325 F.


7:Bake cheesecake at second lower rack of the oven in a water bath (bain marie) or 1 hours 10 minutes or until set and golden brown .


8:Remove from oven and let's cool down before remove from spring foam pan on cooling rack for 30 minutes before store in fridge for another 1 hour before serve.
I used 2 mini spring foam pan instead of 8 inch spring foam pan.


Note:


Must cold down the cream cheese mixture completely before mix with flour mixture,if not the cake won't be as light as cotton.

Thursday, December 26, 2013

JAPANESE SOUFFLÉ CHEESECAKE

JAPANESE SOUFFLÉ CHEESECAKE
Source: adapted from Diana's Desserts
(Recipe for one 18 cm cake)
 
The oven is preheated to 180°C, then reduced to 170°C when the baking starts. The original recipe uses 160°C instead.

80 ml milk
40 g butter, at (tropical) room temperature, cut into small pieces
140 g full-fat cream cheese block, at (tropical) room temperature, cut into small pieces
50 g cake flour, sifted
15 g cornstarch, sifted
⅛ tsp salt
mix evenly with sifted cake flour and cornstarch
75 g egg yolks
2 tsp lemon juice

180 g egg whites
90 g caster sugar

Measure and prep ingredients as detailed above.
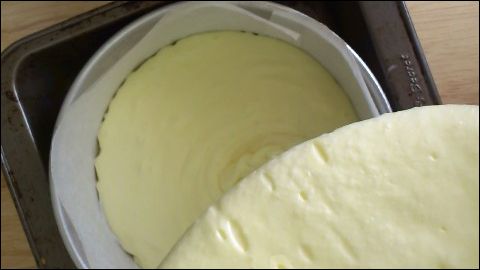
Preheat oven to 180°C (355°F). Put kettle on. Line 18 x 6 cm round cake pan, with parchment paper extending above top of pan by 2-3 cm.

Heat milk till hand-hot. Add to butter and cream cheese. Mix evenly. Add egg yolks and lemon juice. Mix evenly. Sieve, twice so that mixture is silky smooth. Add cake flour, cornstarch and salt. Mix till just even.

Whisk egg whites till big bubbles become small. Continue whisking whilst adding sugar gradually. Keep on whisking till egg whites form soft peaks.

Add egg whites to yolk mixture in 3 batches. Mix till half even after each of first 2 additions, then till just fully even after third addition. Bang mixing bowl against worktop 3-4 times, hard, to remove big air bubbles.

Pour batter into cake pan, slowly so that big air bubbles burst as batter flows out of mixing bowl.

Reboil water in kettle. Put cake pan in a bigger pan. Fill outer pan with boiling water to about half-way up sides of inner cake pan. Reduce oven temperature to 170°C (340°F). Bake in bottom of oven till top of cake is golden brown and inserted skewer comes out with some crumbs attached, about 1¼ hours.

Remove cake from oven. Leave on wire rack to cool down completely. Unmould by inverting onto a plate. Discard parchment paper. Invert onto another plate so that cake is right way up. Cut with serrated knife by moving blade either forward or backward, i.e. do not saw.

HONG KONG EGG TARTS (港式蛋挞)


HONG KONG EGG TARTS (港式蛋挞)


Source: adapted from Aunty Yochana
(Recipe for 20 tarts)
Custard Filling
240 g eggs
160 g sugar
480 ml milk
1¼ tsp vanilla extract
Tart Shells
125 g salted butter, softened
60 g icing sugar, sifted
15 g egg white
15 g egg yolk
1 tsp vanilla extract
210 g plain flour

To make tart filling, whisk sugar with eggs till melted. Add milk and vanilla extract. Whisk till evenly mixed. Sieve to remove big bubbles, into something that can pour without dripping. Set aside till small bubbles subside, about 1¼ hours.

To make tart dough, mix butter and icing sugar till smooth. Add egg white, yolk and vanilla extract. Mix till well combined. If dough is sticky, sprinkle with flour 1 tsp at a time and mix through. If dough is dry and crumbly, sprinkle with water instead 1 tsp at a time. Place dough in freezer till just firm, spread out to cool down faster. This should take 10 minutes or so. When lining tart moulds, remove dough from freezer ¼ portion at a time.

To line tart moulds, smooth 2 plastic sheets so that there are no folds. Roll 30 g dough into a ball. Place ball between plastic sheets. Press evenly with flat-bottomed plate to form a circle 2 mm thick and 10 cm wide, checking thickness and evenness by touching dough with palm. Remove top plastic sheet. Place 8 x 2.5 cm tart mould on dough, rim side down. Flip mould, along with dough and remaining plastic sheet, to face upward. Press dough into mould, from centre to rim. Remove plastic sheet. Trim excess dough around edges. Run fingers round tart mould, gently pressing to even out thickness and remove air pockets if necessary. Trim again if there's excess dough.

To bake tart shells, preheat oven to 150°C. Place shells on baking tray. Bake 15 minutes in middle of oven. Increase temperature to 180°C. Continue baking till slightly brown, another 5 minutes or so. Remove from oven. Leave on wire rack to cool down completely.

To bake tarts, preheat oven to 165°C. If you want to line your baking tray with foil, it should be shiny side down. Pour custard into shells, to 2 mm from rim. Bake 15 minutes in bottom of oven. Reduce temperature to 150°C. Move tray to middle of oven. Top up filling to make up for evaporation. Bake till custard is just slightly wobbly in the middle when shaken, another 15 minutes or so. If custard puffs up during last few minutes but is still too watery in the middle, remove tarts from oven to cool down till custard subsides, then continue baking. Watch custard closely towards the end to make sure it doesn't overcook.

Serve hot, or at least warm. Leftovers should be refrigerated. Tarts may be reheated at 120°C using bottom heat only for 10 minutes or so. Pastry isn't soggy at all if reheated without moulds.

STEAMED YAM CAKE (ORH KUEH; 芋粿/芋头糕)

STEAMED YAM CAKE (ORH KUEH; 芋粿/芋头糕)


Source: Majorly adapted from Cooking for the President
(Recipe for 24 pieces)

40 g dried prawns
rinse and soak in 60 ml water till soft, about 15 minutes;
squeeze dry, reserving the water; chop roughly
30 g Chinese dried mushrooms
rinse and soak in 180 ml water till soft, about 30 minutes;
squeeze dry, reserving the water; slice thinly, then cut 1 cm long
500-600 g yam (aka taro)*
peel and trim to yield about 300 g; rinse; cut corn kernel-sized
100 g shallots
peel, rinse and slice thinly
80 ml vegetable oil
½ tsp salt
¼ tsp five-spice powder
1½ tbsp light soya sauce
½ tsp ground white pepper

200 g rice flour
240 ml water
top up water drained from dried prawns and mushrooms to make 240 ml
600 ml pork or chicken stock, boiling
Garnish
2 tbsp spring onions, roughly chopped
2 tbsp coriander, roughly chopped
½ red chilli, julienned; or 1 tsp toasted white sesame seeds

Sunday, December 22, 2013

No Bake Cheese Cake

No-Bake Cheesecake (Printable recipe)
By Christine's Recipes
Prep time: 5 mins
Cook time: 15 mins + 5 hrs for chilling
Yield: one 17.5cm loose-based square tin

Ingredients:
  • 110 gm digestive biscuits
  • 70 gm butter, melted
  • 250 gm cream cheese block
  • 50 gm caster sugar
  • 1/2 tsp vanilla extract
  • 1/2 tsp lemon juice
  • 200 ml whipping cream
  • fresh mango slices, for garnish
How To Make No-Baked Cheesecake01


How To Make No-Baked Cheesecake02

Method:
  1. Put the digestive biscuits in a sealed plastic bag. Crush to crumbs with a rolling pin. Transfer the crumbs to a bowl. Pour over the melted butter. Combine well. Place them into the tin and press firmly with the bottom of a cup to create an even layer. You might need a spoon or spatula to help when pressing for the 4 corners of the tin.
  2. In a large mixing bowl, beat the cream cheese, sugar, lemon juice and vanilla extract with an electric mixer until smooth.
  3. Use another mixing bowl, beat the whipping cream until fluffy and smooth. Stir into the cream cheese mixture and combine well.
  4. Spoon the mixture onto the biscuit base. Use a spatula to level the surface. You might like to smooth the top of the cheesecake with the back of a spoon damped with water. Chill in freezer for at least 5 hours, or until completely set. Transfer it into fridge for about 2 hours before serving. Slice into pieces and garnish with fresh mango slices, or any fruits in season.

No-Bake Cheesecake02

Notes:

  • You can use either unsalted or regular butter.
  • To get a very smooth surface of your cheesecake, try to use a damped spoon for the final touch, as the cream cheese mixture tends to stick to the spatula.


Read more: http://en.christinesrecipes.com/2013/01/no-bake-cheesecake.html#ixzz2oFtlmJVV

Japanese Cheesecake (Fluffy & Creamy)

Japanese Cheesecake (Fluffy & Creamy)


Japanese Cheesecake01

When I tried the Japanese cheesecake with the very first bite, I have been fallen in love with it ever since. The velvety smooth, creamy, as well as the fluffy texture makes this kind of cheesecake stand out the crowd. The cheesecake is not too sweet, yet just enough to entertain your sweet tooth if you have one. Mind you, the cooking method makes the cheesecake very light, you’d feel you don’t have enough even after having a big slice of it. A case in point, over half of the cheesecake was gone shortly after I placed it in the fridge. I didn’t blame my daughter at all, because it’s so intriguing. Who can resist it?

This kind of cheesecake is always a big hit in Hong Kong and other Asian countries. Just hop over to my Chinese fan page and browse the comments asking for more tips, you’d know what I’m trying to say.

For making this Japanese cheesecake, many people find it’s a bit hard to overcome two common problems that contribute to making unpleasant looking cakes. Firstly, the surface of cheesecakes has a tendency to crack during or after baking. Secondly, the cake would easily shrink as it cools down. Although the taste remains the same, I believe every baker, like me, would love to see a perfect, or at least a good, pleasant looking cheesecake being served before your or your loved ones’ eyes. I’m not a professional baker, just like all other home cooks, love baking some delicious desserts to feed my family. Here I’d share what worked for me. Feel free to drop a comment to share what I miss in this post, or what methods worked for you when making this cheesecake.

Japanese Cheesecake (Fluffy & Creamy) (Printable recipe)
By Christine's Recipes
Prep time: 20 mins
Cook time: 60 mins
Yield: 2 baking pans, lined with baking paper, each size 11.5cmx22cmx6cm

Ingredients:
  • 250 ml milk
  • 250 gm cream cheese, cubed and softened at room temperature
  • 60 gm butter, softened at room temperature
  • 6 egg yolks
  • 55 gm cake flour
  • 20 gm corn flour
  • 1 lemon zest
  • 6 egg whites
  • 1/4 tsp cream of tartar
  • 130 gm caster sugar


Method:
  1. Preheat oven to 150C (302F).
  2. Use a large bowl, pour in milk. Place the bowl over simmering water. Don’t let the bottom of the bowl touch the water. Add cream cheese, stir occasionally, until completely dissolved and the mixture turns smooth. Stir in butter, till dissolved. Remove from heat. Let cool down a bit, then add the egg yolks and combine well. (Note: Make sure the mixture is not too hot, as you don’t want to cook the egg yolks at this stage.)
  3. Combine cake flour and corn flour. Sift in the flours into the cream cheese mixture, a small amount at a time. Mix well between every addition, and make sure there aren’t any flour lumps. Stir in freshly grated zest. Set aside.
  4. Place egg whites in a large clean bowl. (Note: Make sure there’s no oil or water in the bowl at all.) Use an electric mixer to beat the egg whites for 3 minutes, then add cream of tartar and blend again. Pour sugar in the egg whites and blend until very stiff peaks form. (Please refer to this video: How To Beat Egg Whites.)
  5. Fold-in the egg whites into the cream cheese mixture gently with a rubber spatula just until all ingredients are incorporated. Do not stir or beat. For a better result, fold in egg whites with a small amount at a time, at least for 3 times. (Please refer to this post with video: How To Fold-in Egg Whites).
  6. Pour the mixture into the two baking pans. Place the pans into another larger baking tray. Add hot water in the tray up to half way. Bake for about 50 to 60 minutes. Test with a needle or skewer that comes out clean.
  7. Turn off the oven. Leave the oven door ajar for 10 minutes. Remove from the oven and remove from the pans. Let cool completely on a wire rack. Chill in a fridge for about 3 hours. Enjoy!
Japanese Cheesecake02

Notes:
  • Get cream cheese block to make this cheesecake. Don't ever use the cheese spread. Your cheesecake will be too wet otherwise.
  • The delicate, velvety smooth texture of this cheesecake is produced by two low-protein flours, cake flour or corn flour.
  • The beaten egg whites generate very small air pockets in the inner structure of the cake. So, when it comes to making this cake, it’s very important to know how to beat egg whites and how to fold-in egg whites properly. I’ve uploaded two videos on youtube for those who need them, here and here.
  • To prevent the surface of the cheesecake from cracking: use low temperature and water-bath method during baking. The surface of the cake has a tendency to rise high to a point that breaks the structure. So, the basic principle is to keep the oven as low as the recipe suggests as 150C (302F). Mind you, every oven is so different, know your oven. And you have to keep an eye on it when baking. When the cake surface rises too high, that means the temperature of your oven is too high. Reduce the temperature accordingly.
  • To prevent the cheesecake from shrinking: open the oven door ajar for 10 minutes or so, and let your cheesecakes cool down gradually. But don’t keep them there too long because moist would develop at the bottom of the baking pans.
  • If using a loose base cake tin, cover the outside of the tin bottom with double layers of aluminium foil to prevent water from seeping in.
Japanese Cheesecake03


Read more: http://en.christinesrecipes.com/2011/02/japanese-cheesecake-fluffy-creamy.html#ixzz2oFszGVrz

Banana Cake

Banana Cake (Printable recipe)
By Christine's Recipes
Prep time: 10 mins
Cook time: 60 mins
Yield: one baking pan, sized 11.5cmx22cmx6cm

Ingredients:
  • 1 1/2 cups plain flour
  • 250 4 ripe bananas
  • 1/3 cup unsalted butter, melted
  • 3/4 cup sugar, white or brown (if you like darker colour, use brown)
  • 1 egg, whisked
  • 1 tsp vanilla extract
  • 1 tsp baking soda
  • 1/8 tsp salt
  • 1/4 cup (or 1/2 cup, depending on the thickness of the batter)

Banana Cake Procedures

Method:
  1. Preheat oven to 175C (350F).
  2. Smashed the ripe bananas in a large bowl with a spoon or process in a food processor. Use a wooden spoon or spatula to combine melted butter with the smashed bananas. Stir in sugar, whisked egg and vanilla. Add 1/4 cup of the milk first, then combine well. If the batter is too thick, add more and adjust the amount as you go.
  3. Sprinkle the baking soda and salt in the mixture. Stir in sifted flour, one third at a time. No need to stir too hard, just fold and incorporate all ingredients thoroughly.
  4. Transfer mixture into a greased 4x8 inch baking pan. Bake for about 1 hour. Test with a needle. If it comes out clean, the cake is cooked through. Remove from oven and let cool on a rack. Enjoy!
Notes:

  • If you feel too tired of smashing banana with a spoon, use a food processor. Just process bananas for a few seconds if you’d like to retain some texture.
  • I found it’s better not to use an electric mixer for making banana cake. Use a spoon or whisk just to incorporate all ingredients together without over-stirring. The cake would be turned out really soft.


Read more: http://en.christinesrecipes.com/2009/11/banana-cake-recipe.html#ixzz2oFqdFiea

Thursday, December 19, 2013

JOCONDE DE COCOA / OPERA CAKE

The Yellow Sponge Cake
280 g - whole eggs

210 g - icing sugar

210 g - ground almond

60 g - cake flour

190 g - egg white

35 g - caster sugar

35 g - melted butter

  1. Whisk egg, icing sugar, ground almond till fluffy then add in flour and mix
  2. Whisk egg white and sugar till light soft peak then fold into flour mixture


  1. Then get some mixture to fold into melted butter
  2. Then slowly fold into reminder mixture
  3. Bake at 220 C for 8 minutes.

 
Flourless Chocolate Sponge

240 g egg yolk

100 g caster sugar

425 g egg white

350 g caster sugar

120 g cocoa powder

Whisk egg yolk and sugar till fluffy

Whisk egg white and sugar till soft peak


Fold egg yolk into egg white until well mixed

Then fold in cocoa powder and mix well

Bake at 180 C for 18 - 20 minutes


Coffee Syrup

140 g - warm water

10 g - instant coffee powder ( I used nescafe)

2 g - gelatine

140 ml - sugar syrup

15 ml - water

Dissolved gelatine with water then dissolved nescafe with warm water and mix together. Then pour in sugar syrup set a side


Sugar Syrup

65 g water

75 g caster sugar


Boil at low heat for 3 minutes


Chocolate Cream


250 g dairy UHT whip cream

100 g egg yolk

5 g gelatine powder

30 g water

130 g dark chocolate melted

250 g Rich's chowhip cream


Boil dairy cream to 60 C then pour into eggyolk and again boil at 80 C

Gradually pour in dissolved gelatine

Pour in melted dark chocolate

Finally mix in whipped chocolate cream


To assemble the cake:

Line a baking sheet with parchment or wax paper. Place almond cake on the parchment and moisten the layer with coffee syrup. Spread about three-quarters of the coffee buttercream evenly over the cake. (If the chocolate cream is soft, put the cake in the freezer for about 10 minutes before proceeding.) Spread the chocolate cream over the surface, top with the chocolate sponge cake, moisten, then chill the cake in the freezer for about 10 minutes. Cover the top of the cake with a thin layer of coffee chocolate cream. (This is to smooth the top and ready it for the glaze - so go easy.) Refrigerate the cake for at least 1 hour or for up to 6 hours; it should be cold when you pour over the glaze. If you're in a hurry, pop the cake into the freezer for about 20 minutes, then continue.


At serving time, sieve coao powder and carefully trim the sides of the cake so the layers revealed.


Keeping: Each element of the cake can be made ahead, as can the assembled cake. The cake can be kept in the refrigerator, away from foods with strong odors, for 1 day, or you can freeze the cake, wrap it airtight once it is frozen, and keep it frozen for 1 month; defrost, still wrapped, overnight in the refrigerator.