Katharine Hepburn Brownies:
2 ounces (60 grams) unsweetened chocolate, coarsely
chopped
1/2 cup (113 grams) unsalted butter, cut into
pieces
1 cup (200 grams) granulated white sugar
2 large eggs, at room temperature
1 teaspoon pure vanilla
extract
1/4 cup (30 grams) all-purpose flour
1/4 teaspoon salt
1 cup (100 grams) chopped walnuts or pecans or 2/3 cup (110 grams)
chocolate chips
(optional)
These brownies are made in one bowl.
You can mix the ingredients together with a wire whisk or you can use a handheld
electric mixer. The brownies are made with unsweetened chocolate, which is also
known as baking, plain or bitter chocolate. It is chocolate in its rawest form
and this means that unsweetened chocolate is just ground cocoa nibs that have
been refined and contain between 50-55% cocoa butter (cacao fat). This type of
chocolate contains no sugar so it has a strong, bitter taste that is used in
cooking and baking but is never eaten out of hand. Finally,
there is always the
debate of whether brownies should contain nuts. It is really a personal choice
so you can add them or leave them out as you choose. Personally I leave them out
and add chocolate chips instead which add a pleasing crunch and even more
chocolate flavor. I prefer to chill these brownies overnight before serving. I
find the texture of brownies becomes more fudgy and the flavors have time to
develop.
Preheat oven to 325 degrees F
(165 degrees C) and place rack in center of oven. Butter an 8 inch (20 cm)
square baking pan and line the bottom of the pan with parchment
paper.
Melt the chocolate
and butter in a stainless steel bowl placed over a saucepan of simmering water.
Remove from heat and stir, or whisk, in the sugar. Next, stir in the vanilla
extract. Whisk in the eggs, one at a time. Finally, stir in the flour, salt and
chopped nuts or chocolate chips (if using).
Pour into the
prepared pan and bake for about 30 - 35 minutes, or until a toothpick inserted in
the center comes out with a few moist crumbs clinging to it. Remove from oven
and let cool on a wire rack. Then cover and place in the refrigerator overnight.
Serve at room temperature or chilled. These freeze very
well.
|
Friday, May 23, 2014

Crispy Roasted Pork Belly Recipe
Crispy Roasted Pork Belly Recipe
6 cloves garlic
1 teaspoon five spice powder
1 cup salt
2. Wash and use paper towels to dry the pork belly.
3. Make some horizontal slits on the sides of the belly, then insert each garlic and push them deep in so they don’t burn.
4. Rub the meat side with the five spice powder.
5. Then layer the top of the pork belly with the salt evenly.
6. Place the pork belly on a wire rack, and place at the top 1/3 of the oven for 1 hour. While baking, the oil will drip to the bottom pan with water.
7. Bake until the salt crust forms, the salt should be hardened. Check water in the pan below and add if needed.
8. Remove the pork belly from the oven, pull off the salt crust and discard.
9. Raise the heat of oven to 465f/240c, place the pork belly back in and roast for another 40 minutes.
10. Remove from oven and let set for 10 minutes. Cut and serve immediately with some chili sauce and hoisin sauce, or eat as is.

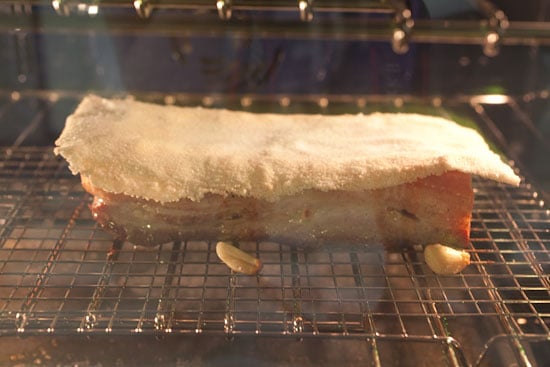
Place the pork belly on a wire rack. This is how the pork belly and salt crust look in the oven. You have to insert the garlic deep inside the horizontal slits or else they will be pushed out during the roasting process.
Ingredients:
1 lb pork belly6 cloves garlic
1 teaspoon five spice powder
1 cup salt
Method:
1. Preheat the oven to 350F/180c, arrange a pan on the bottom 1/3 of oven rack and fill with water. The pork belly should be roasted using the rack above it.2. Wash and use paper towels to dry the pork belly.
3. Make some horizontal slits on the sides of the belly, then insert each garlic and push them deep in so they don’t burn.
4. Rub the meat side with the five spice powder.
5. Then layer the top of the pork belly with the salt evenly.
6. Place the pork belly on a wire rack, and place at the top 1/3 of the oven for 1 hour. While baking, the oil will drip to the bottom pan with water.
7. Bake until the salt crust forms, the salt should be hardened. Check water in the pan below and add if needed.
8. Remove the pork belly from the oven, pull off the salt crust and discard.
9. Raise the heat of oven to 465f/240c, place the pork belly back in and roast for another 40 minutes.
10. Remove from oven and let set for 10 minutes. Cut and serve immediately with some chili sauce and hoisin sauce, or eat as is.
Cook’s Note:
Place the pork belly on a wire rack. This is how the pork belly and salt crust look in the oven. You have to insert the garlic deep inside the horizontal slits or else they will be pushed out during the roasting process.

Sunday, May 18, 2014
Hokkaido Milk Loaf
Hokkaido Milk Loaf
 Non-baked Mango cheesecake - by Yvonne Mah
Crust
250g Digestive Biscuit, finely crushed
90-110g Butter, melted
1. Grease a 20cm springform cake pan.
2. Combine crushed biscuit crumb and melted butter. Press the biscuit crumb firmly onto the base of the greased pan. Chill in the refrigerator for later use.
Filling
250g Cream Cheese (room temperature)
50g Sugar
2-3 Mangoes (depends on size)
14g Gelatin Powder
60ml Water, warm
1/2 tsp Vanilla Extract
150ml Thickened Cream, whipped
1. Blend mango to obtain 220g puree (reserve 100g for the Mango Puree Topping) and dice the rest.
2. Dissolve gelatin powder in warm water and set aside for about 5 minutes.
3. Beat cream cheese and sugar together.
4. Add mango puree & gelatin to the cheese mixture and mix well. Next, add the whipped cream and vanilla extract and mix well. Lastly add the diced mango.
5. Pour into the cake pan and smooth the surface. Chill in the refrigerator for at least 4 hours or until set.
 Mirror like Mango Puree Topping
125g Water
100g Mango Puree
30g Sugar
9g Gelatin Powder
1. Bring all the ingredients to a boil and make sure gelatin and sugar is dissolved.
2. Strain mixture and leave it to cool down slightly.
3. Pour slowly over top of the cake. Refrigerate until set. Enjoy

 Recipe:
1) digestive biscuit 57g
2) melted butter 30g
3) cream cheese 155g
4) whipping cream 120ml
5) sugar 50g
6) 4 Oreo cookies
7) 1 teaspoon lemon juice
8) 1/2 teaspoon vanilla extract
Method:
1) crushed the digestive biscuit, pour melted butter in and mix well, press the digestive biscuit into jar as base.
2) crush Oreo biscuits
3) mix in a bowl cream cheese, sugar, lemon juice and vanilla extract
4) beat whipping cream to soft peaks and mix it into mixture from no 3
5) pour in crushed Oreo and mix well
6) put into jar and freeze well.
Happy baking :):)
 Lychee cheesecake (non bake) - by Mandy Chew
recipe link http://mandysbakingjourney.blogspot.co.uk/2014/05/lychee-cheesecake-non-bake.html
Showing posts with label Cheese-Cake. Show all posts
Showing posts with label Cheese-Cake. Show all posts
Sunday, May 18, 2014


non-baked Mango cheesecake - by Yvonne Mah
Crust
250g Digestive Biscuit, finely crushed
90-110g Butter, melted
1. Grease a 20cm springform cake pan.
2. Combine crushed biscuit crumb and melted butter. Press the biscuit crumb firmly onto the base of the greased pan. Chill in the refrigerator for later use.
Filling
250g Cream Cheese (room temperature)
50g Sugar
2-3 Mangoes (depends on size)
14g Gelatin Powder
60ml Water, warm
1/2 tsp Vanilla Extract
150ml Thickened Cream, whipped
1. Blend mango to obtain 220g puree (reserve 100g for the Mango Puree Topping) and dice the rest.
2. Dissolve gelatin powder in warm water and set aside for about 5 minutes.
3. Beat cream cheese and sugar together.
4. Add mango puree & gelatin to the cheese mixture and mix well. Next, add the whipped cream and vanilla extract and mix well. Lastly add the diced mango.
5. Pour into the cake pan and smooth the surface. Chill in the refrigerator for at least 4 hours or until set.
125g Water
100g Mango Puree
30g Sugar
9g Gelatin Powder
1. Bring all the ingredients to a boil and make sure gelatin and sugar is dissolved.
2. Strain mixture and leave it to cool down slightly.
3. Pour slowly over top of the cake. Refrigerate until set. Enjoy
Oreo cheese cake in a jar - By Pey Yng
Recipe: 1) digestive biscuit 57g
2) melted butter 30g
3) cream cheese 155g
4) whipping cream 120ml
5) sugar 50g
6) 4 Oreo cookies
7) 1 teaspoon lemon juice
8) 1/2 teaspoon vanilla extract
Method:
1) crushed the digestive biscuit, pour melted butter in and mix well, press the digestive biscuit into jar as base.
2) crush Oreo biscuits
3) mix in a bowl cream cheese, sugar, lemon juice and vanilla extract
4) beat whipping cream to soft peaks and mix it into mixture from no 3
5) pour in crushed Oreo and mix well
6) put into jar and freeze well.
Happy baking :):)
Saturday, May 17, 2014
Lychee cheesecake (non bake) - by Mandy Chew
recipe link http://mandysbakingjourney.blogspot.co.uk/2014/05/lychee-cheesecake-non-bake.html
Wednesday, May 14, 2014
Hokkaido Milk Loaf - By Fiona Lau


Ingredient:
500gm Bread flour
60gm Cake flour
10gm instant yeast
30gm Milk powder
80gm Sugar
6gm Salt
1 large Egg
250gm Fresh milk
130gm Whipping cream
I just Put all of the ingredients into the bread maker machine in the order recommended by the manufacturer. Program the machine for basic white bread and press Start! Yes, it is that simple and easy with bread machine....!!
500gm Bread flour
60gm Cake flour
10gm instant yeast
30gm Milk powder
80gm Sugar
6gm Salt
1 large Egg
250gm Fresh milk
130gm Whipping cream
I just Put all of the ingredients into the bread maker machine in the order recommended by the manufacturer. Program the machine for basic white bread and press Start! Yes, it is that simple and easy with bread machine....!!

Non-baked Mango cheesecake
Non-baked Mango cheesecake - by Yvonne MahCrust
250g Digestive Biscuit, finely crushed
90-110g Butter, melted
1. Grease a 20cm springform cake pan.
2. Combine crushed biscuit crumb and melted butter. Press the biscuit crumb firmly onto the base of the greased pan. Chill in the refrigerator for later use.
Filling
250g Cream Cheese (room temperature)
50g Sugar
2-3 Mangoes (depends on size)
14g Gelatin Powder
60ml Water, warm
1/2 tsp Vanilla Extract
150ml Thickened Cream, whipped
1. Blend mango to obtain 220g puree (reserve 100g for the Mango Puree Topping) and dice the rest.
2. Dissolve gelatin powder in warm water and set aside for about 5 minutes.
3. Beat cream cheese and sugar together.
4. Add mango puree & gelatin to the cheese mixture and mix well. Next, add the whipped cream and vanilla extract and mix well. Lastly add the diced mango.
5. Pour into the cake pan and smooth the surface. Chill in the refrigerator for at least 4 hours or until set.
Mirror like Mango Puree Topping
125g Water
100g Mango Puree
30g Sugar
9g Gelatin Powder
1. Bring all the ingredients to a boil and make sure gelatin and sugar is dissolved.
2. Strain mixture and leave it to cool down slightly.
3. Pour slowly over top of the cake. Refrigerate until set. Enjoy
250g Digestive Biscuit, finely crushed
90-110g Butter, melted
1. Grease a 20cm springform cake pan.
2. Combine crushed biscuit crumb and melted butter. Press the biscuit crumb firmly onto the base of the greased pan. Chill in the refrigerator for later use.
Filling
250g Cream Cheese (room temperature)
50g Sugar
2-3 Mangoes (depends on size)
14g Gelatin Powder
60ml Water, warm
1/2 tsp Vanilla Extract
150ml Thickened Cream, whipped
1. Blend mango to obtain 220g puree (reserve 100g for the Mango Puree Topping) and dice the rest.
2. Dissolve gelatin powder in warm water and set aside for about 5 minutes.
3. Beat cream cheese and sugar together.
4. Add mango puree & gelatin to the cheese mixture and mix well. Next, add the whipped cream and vanilla extract and mix well. Lastly add the diced mango.
5. Pour into the cake pan and smooth the surface. Chill in the refrigerator for at least 4 hours or until set.
125g Water
100g Mango Puree
30g Sugar
9g Gelatin Powder
1. Bring all the ingredients to a boil and make sure gelatin and sugar is dissolved.
2. Strain mixture and leave it to cool down slightly.
3. Pour slowly over top of the cake. Refrigerate until set. Enjoy
OTAH-OTAH
OTAH-OTAH
Ingredient :
Lime leaves
lemon grass
Chillie powder
Big onion
garlic
Galangah
2 Eggs
1Packet of Coconut Milk
Fresh Turmeric
Sal & Sugar
Pepper
Blend all the ingredient
Put in the eggs , Coconut Milk & the Mackeral Fish / Prawn
leave in the fridge for 30min
wrap in banana leaves
and grill ( 5 min )
Ingredient :
Lime leaves
lemon grass
Chillie powder
Big onion
garlic
Galangah
2 Eggs
1Packet of Coconut Milk
Fresh Turmeric
Sal & Sugar
Pepper
Blend all the ingredient
Put in the eggs , Coconut Milk & the Mackeral Fish / Prawn
leave in the fridge for 30min
wrap in banana leaves
and grill ( 5 min )
Éclairs filled with Cream Légère
Éclairs filled with Cream Légère
Ingredients:
for the pâte choux:
250g water (9oz)
110g butter cubed (4oz)
pinch of salt and sugar
140g all purpose flour (5oz)
3 to 5 eggs (you have to check the dough's consistency)
egg wash:
1 egg
2 tbs milk
whisk it to combine
for the creme légère:
500g milk (17oz)
1/2 vanilla bean, split lengthwise and scraped or 1 tsp vanilla extract
4 egg yolks
75g sugar (2 1/2 oz)
2 tbsp flour
2 tbsp cornstarch
100 ml cold heavy cream
for the chocolate glaze:
60g bittersweet chocolate
2 tbsp heavy cream
1 tbsp honey
2 tbsp water
Ingredients:
for the pâte choux:
250g water (9oz)
110g butter cubed (4oz)
pinch of salt and sugar
140g all purpose flour (5oz)
3 to 5 eggs (you have to check the dough's consistency)
egg wash:
1 egg
2 tbs milk
whisk it to combine
for the creme légère:
500g milk (17oz)
1/2 vanilla bean, split lengthwise and scraped or 1 tsp vanilla extract
4 egg yolks
75g sugar (2 1/2 oz)
2 tbsp flour
2 tbsp cornstarch
100 ml cold heavy cream
for the chocolate glaze:
60g bittersweet chocolate
2 tbsp heavy cream
1 tbsp honey
2 tbsp water
Orh Nee (Teochew Yam Paste)
Ingredients required:
1 large yam (1.2kg to 1.5kg)
500g pumpkin
1 packet of gingko (125g) (I used fresh gingko)
6 tbsp sugar
1 litre of vegetable oil
200g shallots
8 pieces Pandan Leaves
Steps:
1) Rinse the gingko nuts.
2) Add the gingko into 500ml of boiling water with 4 tbsp of sugar and 2 pieces of pandan leaves. Boil for an hour or until the gingko nuts are tender and do not taste bitter. Keep aside the water used to boil the gingko nuts.
3) Slice shallots and fry in vegetable oil till golden brown. Strain and keep the oil for later use.
4) You may store the shallots for future used.
5) Cut pumpkin into large cubes.
6) Steam 15-20min the cubed pumpkin together with 3 pieces of pandan leaves, or until pumpkin is tender.
7) Once done, sieve to drain off excess water before mashing the pumpkin/ or you may leave the pumpkin as in cube.
8) Add 1 1/2 to 2 tbsp of sugar and mash and set aside.
9) As for yam, slice them into small pieces for easy to handle after steaming.
10) Steam between 30 minutes to 45 minutes, or until the yam (include also 3 pieces of pandan leaves, this is for nice aroma) is tender and gives easily when poked with a chopstick.
11) Sieve off the waters from the yam before mashing. Mash the yam immediate once it's cooked until your preferred consistency of the paste.
12) Add in 2 tbsp of sugar and 5 tbsp of the water from boiling the gingko, in steps 2.
13) Put the mashed yam in a non-stick pan over low heat and add in about 600ml to 800ml of shallot oils from steps 3.
14) Stir immediately and continuously to prevent the paste from drying. The oil helps to give more moisture and a gooey texture.
15) Once done, you may serve the yam paste with mashed/ cube pumpkin on the side together with gingko.
1 large yam (1.2kg to 1.5kg)
500g pumpkin
1 packet of gingko (125g) (I used fresh gingko)
6 tbsp sugar
1 litre of vegetable oil
200g shallots
8 pieces Pandan Leaves
Steps:
1) Rinse the gingko nuts.
2) Add the gingko into 500ml of boiling water with 4 tbsp of sugar and 2 pieces of pandan leaves. Boil for an hour or until the gingko nuts are tender and do not taste bitter. Keep aside the water used to boil the gingko nuts.
3) Slice shallots and fry in vegetable oil till golden brown. Strain and keep the oil for later use.
4) You may store the shallots for future used.
5) Cut pumpkin into large cubes.
6) Steam 15-20min the cubed pumpkin together with 3 pieces of pandan leaves, or until pumpkin is tender.
7) Once done, sieve to drain off excess water before mashing the pumpkin/ or you may leave the pumpkin as in cube.
8) Add 1 1/2 to 2 tbsp of sugar and mash and set aside.
9) As for yam, slice them into small pieces for easy to handle after steaming.
10) Steam between 30 minutes to 45 minutes, or until the yam (include also 3 pieces of pandan leaves, this is for nice aroma) is tender and gives easily when poked with a chopstick.
11) Sieve off the waters from the yam before mashing. Mash the yam immediate once it's cooked until your preferred consistency of the paste.
12) Add in 2 tbsp of sugar and 5 tbsp of the water from boiling the gingko, in steps 2.
13) Put the mashed yam in a non-stick pan over low heat and add in about 600ml to 800ml of shallot oils from steps 3.
14) Stir immediately and continuously to prevent the paste from drying. The oil helps to give more moisture and a gooey texture.
15) Once done, you may serve the yam paste with mashed/ cube pumpkin on the side together with gingko.
Kaya (Malaysian Coconut Egg Jam) Recipe
Kaya (Malaysian Coconut Egg Jam) Recipe
200 g (7 oz) sugar
1/2 cup coconut cream
3//4 cup coconut milk
3 pandan leaves, tie into a knot
1 1/2 tablespoons corn starch + 1 1/2 tablespoons water
Caramel:
50 g – 75 g (1.5 oz to 2.5 oz) sugar
Transfer the egg mixture into a sauce pan (non-stick preferred). Add the pandan leaves into the egg mixture and turn on the heat to medium low. Using a wood spatula or a pair of wooden chopsticks, keep stirring the mixture until they are cooked, about 20 minutes. To thicken the kaya, add the corn starch mixture, stir to combine well with the kaya. Please take note that lumps will form in the jam.
In the meantime, heat up the sugar in a sauce pan until the sugar melts into caramel. When the color becomes golden brown, add the caramel into the kaya, stir to combine well. The color of the kaya should be golden brown. Turn off the heat.
Let the kaya jam cool down, discard the pandan leaves and transfer the kaya to a blender. Blend until it reaches a silky smooth consistency and without lumps. Transfer the kaya to a jam bottle. You can keep it in the fridge for about a week.
Ingredients:
5 eggs200 g (7 oz) sugar
1/2 cup coconut cream
3//4 cup coconut milk
3 pandan leaves, tie into a knot
1 1/2 tablespoons corn starch + 1 1/2 tablespoons water
Caramel:
50 g – 75 g (1.5 oz to 2.5 oz) sugar
Method:
Crack the eggs into a big bowl or container, follow by the coconut cream, coconut milk, and sugar. Whisk well, or using an electronic hand mixer, whisk the mixture well. Filter the mixture with a strainer.Transfer the egg mixture into a sauce pan (non-stick preferred). Add the pandan leaves into the egg mixture and turn on the heat to medium low. Using a wood spatula or a pair of wooden chopsticks, keep stirring the mixture until they are cooked, about 20 minutes. To thicken the kaya, add the corn starch mixture, stir to combine well with the kaya. Please take note that lumps will form in the jam.
In the meantime, heat up the sugar in a sauce pan until the sugar melts into caramel. When the color becomes golden brown, add the caramel into the kaya, stir to combine well. The color of the kaya should be golden brown. Turn off the heat.
Let the kaya jam cool down, discard the pandan leaves and transfer the kaya to a blender. Blend until it reaches a silky smooth consistency and without lumps. Transfer the kaya to a jam bottle. You can keep it in the fridge for about a week.
Cook’s Notes:
- Use fresh coconut cream and coconut milk if possible. I used Kara brand coconut cream and coconut milk.
- If you like your kaya lighter color, use 50 g of sugar for the caramel. I used 75 g.
- My aunt told me that I can use 3, 4, or 5 eggs, so it’s totally up to you. I like my kaya rich, so I used 5 eggs. I also like my kaya to have a thicker consistency instead of runny, as I don’t like the “watery” part of the kaya making my toast “soggy.”
Saturday, May 17, 2014
Super Delicious Cream Puff
Delicious Cream Puff
Ingredient for Cream Puff
500gm water
200gm Butter
250gm Plain Flour
6 Eggs
Boil the 500gm water over the stove
add in the Butter to slowly melt the butter
oce the Butter is completely melt and the water starts to boil, add in the Flour and continue to keep stirring.
The dough will become dry and not stick to the side, thats when it is ready. let it cool abit then add in the 6 eggs and stir again over small flame. Stir until it is concentrated ( slight white smooth paste )
Bake in the oven @ 170 degree for about 15min, drop the temperture to 160 degree for 15 min and off the temperature for another 15 min
Ingredient for Cream
2 Cups - Evaporate Milk
70gms - Custard Power
10 Tbsp - Sugar
14gm - Butter
3 Cups - Water
2 Eggs Yolk + 1 Egg
Dissolve the custard powder with some water , add in the sugar , bring the ater to a boil
add in the 2 cup of evaporate milk , , pour into the mixture, use medium flame and keep stiring the mixture, do opt stop stirring or it will get lumpy, just before it thicken, add in the butter, contiue to stir , add in the beaten the egg + the egg yolk until it thicken. Once it start to thicken, off the fire and leave it to cool.
Now the Puff is ready, cut the Puff in the centre and put in a spoon of the custard cream.
Ingredient for Cream Puff
500gm water
200gm Butter
250gm Plain Flour
6 Eggs
Boil the 500gm water over the stove
add in the Butter to slowly melt the butter
oce the Butter is completely melt and the water starts to boil, add in the Flour and continue to keep stirring.
The dough will become dry and not stick to the side, thats when it is ready. let it cool abit then add in the 6 eggs and stir again over small flame. Stir until it is concentrated ( slight white smooth paste )
Bake in the oven @ 170 degree for about 15min, drop the temperture to 160 degree for 15 min and off the temperature for another 15 min
Ingredient for Cream
2 Cups - Evaporate Milk
70gms - Custard Power
10 Tbsp - Sugar
14gm - Butter
3 Cups - Water
2 Eggs Yolk + 1 Egg
Dissolve the custard powder with some water , add in the sugar , bring the ater to a boil
add in the 2 cup of evaporate milk , , pour into the mixture, use medium flame and keep stiring the mixture, do opt stop stirring or it will get lumpy, just before it thicken, add in the butter, contiue to stir , add in the beaten the egg + the egg yolk until it thicken. Once it start to thicken, off the fire and leave it to cool.
Now the Puff is ready, cut the Puff in the centre and put in a spoon of the custard cream.
Cream Puffs
Cream Puffs
Ingredients
Custard cream:
750ml milk
160gm sugar
30gm plain flour
30gm cornflour
4 egg yolks
1 tsp vanilla bean paste
Choux Pastry:
125ml milk
125ml water
125gm bread flour
125gm salted butter
5 eggs (55gm each egg)
Method
Custard cream:
Choux Pastries:


 In attempt of a choux pastry recipe that puffs really high and hollow for my ice-cream filled profiteroles, I baked them in mini cupcake trays greased with melted butter at 180 degrees for 60 mins. And, leave them in the oven to cool down. They were dry and crunchy which made it very ideal for ice creams!
Ingredients
Custard cream:
750ml milk
160gm sugar
30gm plain flour
30gm cornflour
4 egg yolks
1 tsp vanilla bean paste
Choux Pastry:
125ml milk
125ml water
125gm bread flour
125gm salted butter
5 eggs (55gm each egg)
Method
Custard cream:
- Beat egg yolks with sugar till color turns pale
- Add milk gradually
- Add vanilla, plain flour and cornflour
- Mix well
- Using lowest heat, stir constantly till mixture thickens
- Remove from stove
- Wrap with cling wrap
- Cool down
- Chill in fridge overnight
Choux Pastries:
- Melt butter in milk and water
- Add salt
- Bring to boil
- Switch to low heat
- Tip in all the bread flour
- Stir vigorously till dough is formed
- Add eggs one at a time
- Beat till smooth
- Lay baking paper onto baking tray
- Spoon teaspoons of dough onto parchment paper
- Bake at 180 degrees for 60 mins until deep golden brown
- Switch rack at 40 mins to brown the lower rack of choux pastries
- Cool on rack
- Cut a small slit on the puff
- Pipe cold custard cream into puffs
- Serve immediately
Notes
- I am using a 56 litres oven. This portion of choux pastries have to be baked on two trays which were placed at the lowest racks. The bottom tray puffed up much later around 30 mins. I switched trays at 40 mins to brown them evenly.
- Choux pastries baked on parchment paper will not sticked, but will sticked on baking/tracing paper or aluminium foil so please grease them before baking.
Other attempts

Pipe out 25 of these larger choux pastries to fit in small scoop of ice creams.

4 eggs makes a firm batter that retains its shape better and does not puff up as much as batter that use 5 eggs. The insides of a 5-eggs batter turned out lighter.

Chewy Chocolate Chips Cookies
Makes 48 cookies (Size of 2 inches diameter)
Ingredients
350gm plain flour
227gm unsalted butter
200gm mini dark chocolate chips
150gm castor sugar
150gm brown sugar
2 eggs
1 tsp baking soda
1 tsp fine salt
1 tsp vanilla extract
Method
Note
Ingredients
350gm plain flour
227gm unsalted butter
200gm mini dark chocolate chips
150gm castor sugar
150gm brown sugar
2 eggs
1 tsp baking soda
1 tsp fine salt
1 tsp vanilla extract
Method
- Cream butter, castor sugar, brown sugar & vanilla extract till color turns pale
- Add eggs one at a time
- Add flour, baking soda and salt
- Add chocolate chips & mix evenly (Do not overmix)
- Chill dough for at least 30 mins
- Preheat oven at 190 degrees
- Line baking tray with baking paper
- Spoon tablespoons of dough onto baking paper with 2 inches spacing apart
- Return unused dough back to chiller
- Bake at 190 degrees for 9-11 mins
- Cool on rack
- Store in airtight containers
Note
- Chocolate chips can be replaced with 100gm cranberries & 100gm macadamia nuts.
- Please note that they are soft when they first came out of the oven. When cooled completely, they turned firm and chewy. So, please don't pop them back into the oven to bake longer, unless you want them crunchy.