Wednesday, April 23, 2014

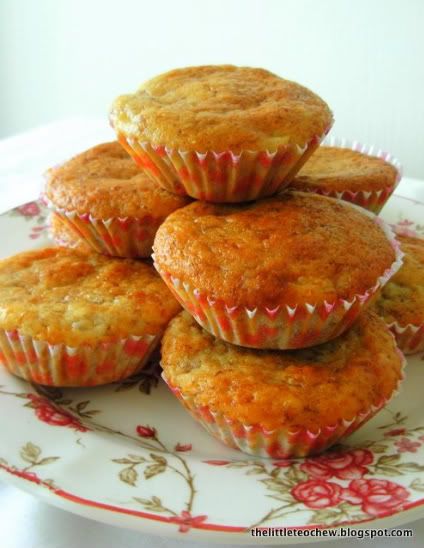
Banana Buttermilk Muffins

Banana Buttermilk Muffins
Recipe
(adapted from here)
- 195g all-purpose flour
- 115g caster sugar
- 2 teaspoons baking powder
- 1 teaspoon baking soda
- 1 cup buttermilk (which I made using 1 cup milk plus 1 tsp lemon juice)
- 3 medium sized (very) ripe bananas, mashed with fork
* If, like me, you like small chunks of banana in our muffins, don't mash them too finely.
- 2 tablespoons canola oil
- 1 large egg
- 1 teaspoon vanilla extract

Preheat oven to 190 degree celsius.

Spray 12 regular muffin cups with non-stick cooking spray.

In a large bowl, mix together the flour, sugar, baking powder and baking soda.

In separate bowl, whisk together the buttermilk, mashed banana, oil, egg and vanilla.

Pour wet ingredients over dry ingredients and stir just until blended.

Spoon batter into muffin cups, filling about three-fourths full. I ran out of these, so I had to make do with cupcake cups.

Bake until lightly brown and a toothpick inserted in center comes out clean, approximately 15 to 20 minutes.

Allow to cool in pan on wire rack for 15 minutes, then turn out onto rack and cool completely.

These muffins freeze well and can be warmed in the microwave.

Photobucket
Photobucket

Muffins

Muffins

Recipe(adapted from Sally's Baking Addiction)

Makes 12 regular muffins

(A) Dry ingredients
- 330g (3 cups) plain flour
- 4 tsps baking powder
- 1 tsp salt

(B) Wet ingredients
- 2 eggs, at room temperature
- 225g (1 cup) sugar (I reduced to 170g)
- 236ml (1 cup) milk, at room temperature
- 118ml (1/2 cup) vegetable oil
- 1/2 tsp pure vanilla extract

Chocolate chips
- 160 to 180g (1 cup semi-sweet chocolate chips - I used mini ones)


1. Preheat oven to 220°C (425°F). Lightly grease muffin tins, including the rims.

2. Whisk (A) briefly in a bowl to mix.

3. Mix (B) in a medium bowl - eggs and sugar first, followed by the rest.

4. Add (B) to (A). Fold gently to combine - using either a spatula or spoon - until no streaks of flour remain. The batter should look lumpy and thick.
A tip on folding:
- We want to combine the ingredients in as few strokes as possible. The less we handle the batter, the fluffier the muffins. Start folding in long, broad strokes, scraping the ingredients from the bottom of the bowl in an upward motion.

5. Sprinkle in the chocolate chips and fold in 2 to 3 strokes to combine.

6. Spoon batter into prepared muffin tins all the way to the brim.

7. Important step: bake at 220°C for the first 5mins and then turn the temperature down to 190°C for another 25mins. Those first 5mins will provide that crucial rise to help produce those beautiful domes. After the muffins are done, allow them to cool for 10mins in the tin before removing. For minimal clean up, use muffin liners, but I wanted the au naturel look today.

Cotton soft japanese cheesecake

Ingredients:

- 140g fine granulated sugar
- 6 egg whites
- 6 egg yolks
- 1/4 tsp cream of tartar
- 50g butter
- 250g cream cheese
- 100ml fresh milk
- 1 tbsp lemon juice (I omitted this)
- 60g cake flour
- 20g corn flour
- 1/4 tsp salt


Preparation:

1. Melt cream cheese, butter and milk over a double boiler. Cool the mixture. Fold in the flour, the cornflour, egg yolks, lemon juice and mix well.

2. Whisk egg whites with cream of tartar until foamy. Add in the sugar and whisk until soft peaks form.

3. Add the cheese mixture to the egg white mixture and fold well. Pour into a 8-inch round cake pan (lightly grease and line the bottom and sides of the pan with greaseproof baking paper or parchment paper). Wrap the base of your cake tin with aluminium foil if you are using a springform tin, to prevent seepage.

4. Bake cheesecake in a water bath for 1 hour 10 minutes or until set and golden brown at 160 degree celcius.

Cotton Soft Japanese CheesecakeRecipe type: Dessert
Number of serving: 6 servings
Preparation time: 30 minutes
Cook time: 40 minutes
Ready in: 1 h, 10 m
Difficulty: Easy


Read more at http://en.petitchef.com/recipes/dessert/cotton-soft-japanese-cheesecake-fid-503120#j3QFJmPXvYPpLJLs.99

Carole Curry Puff


Curry Puff Filing

(A) 120ml oil, 3 red chilies,4 dried chilies, 10 shallots, 3 candle nuts/buah keras, 2 stalks lemongrass.

(B) 250g potatoes and cut into cubes,1 onions and chopped, 1 spring curry leaves, 1/2 tsp coriander powder, 1 tsp turmeric powder, dash of five spice powder, 1/2 tsp salt, 1 tbsp sugar, 200ml water.

2 hard boiled eggs, shelled and divide into 16 portions.

Methods: (1) Saute filling A until fragrant. Add in all ( B )and cook at low heat until potatoes are soft. Remove from heat and leave to cool.


Skin: (A) 200g plain flour,
                       100g shortening
          (B) 300g plain flour, 1 tbsp sugar, 1 tsp salt, 60g margarine
                      (I used butter and it taste nicer), 120ml water.


(2) SKIN A: Put all ingredients into a mixing bowl and mix into a dough. Shape into a ball.

      SKIN B: Mix flour, sugar and salt. Add in margarine into bread rum form. Add in water and knead into smooth dough.

(3) Wrap skin B in skin A. Roll into rectangular shape.


(Note: up to individual to add chicken/beef 200g. Also can add some sweet potatoes like "old chang kee curry puff"). Roll up neatly like swiss roll. Roll into rectangular shape then roll up again tightly like swiss roll. Leave to rest for 20 minutes. (4) Divide the skin into 16 portions. Roll into round shape and wrap up the filling and hard boiled egg. Seal and pinch the edge like curry puffs. (5) Heat up oil for deep frying until golden brown.

Nyonya curry puffs
Carole Yang's photo.

Carole Yang's photo.


Starter Dough , Custard Bread

Starter Dough
210g bread flour
90g cake flour
24g caster sugar
6g instant dry yeast
240g water
Main dough
210g bread flour
90g cake flour
96g caster sugar
1 1/2 tsp salt
24g milk powder
90g egg
54g water
72g unsalted butter, softened

Super Soft Custard Bread 卡士达超软土司

Ingredients
(makes 21.7cm x 9.4cm x 7.7cm loaf)

(A) Custard paste (卡士达酱)
1 egg yolk
10g caster sugar
15g bread flour
65g fresh milk

(B)
250g bread flour
30g caster sugar
1/2 tsp salt
1 tsp instant yeast
15g milk powder
100g water

(C)
25g unsalted butter

Method

1. Put custard paste ingredients (A) into a pan and whisk it until well-mixed. Cook it at low heat, stirring continuously, until it thickens into paste form. Transfer the paste into a small bowl to cool down, then cover with cling wrap and chill in the refrigerator for 60 minutes.


2. Mix ingredients (A) and (B) together until the dough is smooth.

3. Add in butter and continue to knead the dough until it becomes smooth and elastic and no longer sticks.

4. Place the dough in a lightly greased mixing bowl. Cover with cling wrap and let proof for about 80mins (I took about 60 minutes due to the good warm weather).

5. Lightly knead the dough to punch out the gas. Divide the dough into 3 equal portions. Roll the doughs round, cover with cling wrap and rest the doughs for 15 minutes.

6. Slightly flatten each dough and roll into oval shape of about 18cm x 10cm. Roll it up swiss-roll style. Pinch and seal the ends. Place the three doughs in a greased pullman tin, 1 at each end and 1 in the centre, sealed-side down.

7. Cover with cling wrap and proof for another 60 minutes until the pan is 90% full (I can only get it to 80% full, I think it's due to the different size of tin I'm using). Brush the top with egg mixture (optional).

8. Bake at preheated oven at 180-190 deg C for 30 minutes. Cover the bread with aluminium foil after 20 minutes of baking to prevent the top of the bread from over-browning. Unmold immediately.

Chocolate Chip Cookies

RECIPE
Chocolate Chip Cookies (Makes about 45 cookies)
Adapted from The Australian Women's Weekly

Ingredients:
225g unsalted butter, at room temperature
3/4 brown sugar
1/2 cup caster sugar
2 1/4 cup plain flour, sifted with
1 tsp bicarbonate of soda
1 large egg
1 tsp vanilla extract
375g semi-sweet chocolate chips

Method:
1. Cream butter and sugar until batter is light and fluffy.
2. Add egg and vanilla extract. Beat.
3. Add flour and bicarbonate of soda, in 3 parts. Beat.
4. Add chocolate chips. Incorporate using pulse function.
5. Chill for at least 2 hours.
6. Bake at 180C for about 12-13 minutes, or until cookies turn golden brown.
7. Cool on tray for 10 minutes, transfer to cooling rack.
8. Store in air-tight container lined with kitchen towel for up to a week.

Monday, April 21, 2014

Char Siew Pau/Bao

Char Siew Pau/Bao


Ingredients:


A:

3 large thin slices ginger
1 stalk of green onion - cut into 2 - 3 inches length
1 tbsp oil for frying the above
2 cups water

B:

1 tsp chicken powder
1 tbsp dark caramel soya sauce
2 tbsp light soya sauce
4 ozs oyster sauce


C:
1 cup sugar/207 g fine granulated sugar
2 tsp gelatine

D:

2 tbsp tapioca starch
4 tbsp cornstarch
1/2 cup water

Method:

Mix B till well combined

Mix C with a fork or whisk and mix it thoroughly otherwise the sauce will be lumpy.

Make a slurry with D and leave aside

Heat a large skillet or wok with 1 tbsp oil and fry ginger slices and green onions.until aromatic. Add in the water, bring to the boil and cook until the ginger slices and green onions have released their flavor. Remove the ginger slices and green onions and discard.

Stir in mixed B, lower the heat and contine to stir.

Add in C and continue to stir until sugar and gelatine have dissolved.

Finally add in the slurry D and cook until the sauce thickens. Turn off heat and allow sauce to cool before putting into the fridge and let it cool and set for 3 hours before using.

To make Char Siew Filling:

Ingredients:


3 lbs shoulder pork(marbled with fat)
3 - 4 shallots
6 - 8 cloves garlic
6 tbsp sugar
1 1/4 tsp salt
1 1/2 tsp chicken powder(optional)
2 tsp sesame paste
1 1/2 pieces Lam Yee/red fermented bean curd
1 tbsp light soya sauce
2 large eggs
1/2 tsp 5 spice powder
1/2 tsp ground white pepper
2 tbsp Rose Wine


Glaze:

1 lb maltose
4 tbsp water
2 ozs rock sugar
Few slices of ginger
1/4 tsp salt

Method:

Cut shoulder pork into strips and make shallow cuts on the strips so that there is more surface for the marinate.

Pound the shallots and garlic or alternatively grate the ginger and pass the garlic through the garlic press,mix these with the rest of the ingredients and marinate pork strips - the longer the better(leave in the fridge while marinating, turning the pork strips now and then)

Heat oven to 375f and line a baking sheet with aluminium foil and put a greased cooling cake rack on top.

Bake the marinated pork strips until cooked through, turning once (cooking time depends on how thick the pork strips are - 15 mins on one side should be fine)

While the pork strips are being cooked, make the glaze. Fill a large skillet with 1 inch water and bring to the boil, put in the container of maltose, a bowl filled with the rock sugar, water, ginger slices and salt, cover the skillet and cook until both the maltose and rock sugar have melted. Mix these 2 together.

When the pork strips are cooked, glaze them and then broil/grill to char them further thus giving a gkazy shine.

Cool before slicing.


Traditional Char Siew Pau with Homemade Char Siew

Traditional Char Siew Pau with Homemade Char Siew

Ingredients (serves 4-6)
1kg pork (shoulder or collar)
2 tbsp oil
1 cup water
Marinade
1 tsp salt (to add later)
1tsp light soya sauce
1tsp white pepper
2tbsp maltose
2 cubes red fermented bean curds
2tbsp sugar
2 tbsp oyster sauce
1tbsp chinese wine
1tbsp peanut oil
Directions
char siew pau
- clean and dry pork
- mix all ingredients for the marinade (except salt) and marinate pork overnight
- add salt to marinated pork 30mins before cooking
- in a medium wok, heat peanut oil over medium heat. Brown pork on all sides and add marinade and water
- simmer over low heat for about 45 mins until marinade thickens to form sauce
- preheat oven to 250 degrees of grill mode. Brush meat with sauce and remove from wok
- remove excess oil and further thicken the sauce if required
- grill pork in oven until the sides are nicely charred about 5-10 mins each side
- remove and let char skew rest before slicing and serving
Velvety Sauce Recipe adapted from Lily’s Wai Sek Hong
Ingredients
A:
3 large thin slices ginger
1 stalk of green onion – cut into 2-3 inches long
1 tbsp oil for frying the above
2 cups water
B:
1tsp chicken powder
1tbsp dark caramel soya sauce
2tbsp light soya sauce
4oz oyster sauce
C:
1 cup sugar (207g fine granulated sugar)
2 tsp gelatine
D:
2tbsp tapioca starch
4 tbsp cornstarch
1/2 cup water

Directions

char siew pau
- mix B till well combined
- mix C with a fork or whisk and mix it thoroughly otherwise the sauce will be lumpy
- make a slurry with D and leave aside
- heat a large skillet or work with 1tbsp oil and fry ginger slices and green onions until aromatic. Add in water, bring to boil and cook until ginger slices and green onions have released their flavour. Remove ginger slices and green onions and discard
- stir in mixed B, lower the heat and continue to stir
- add in C and continue to stir until sugar and gelatine have dissolved
- finally add in the slurry D and cook until sauce thickens. turn off heat and allow sauce to cool before putting into the fridge and let it cool and set for 3 hours before using
- prepare char siew filling by dicing 1/2lb char siew into tiny dices
- mix in above cooled sauce depending on your preference. do not overmix as sauce will become runny. filling is ready for wrapping into paus/baos


Pau/Bao Recipe adapted from Lily’s Wai Sek Hong
Ingredients
4oz starter dough
2oz fine granulated sugar
1tsp double action baking powder
1/2tsp ammonium bicarbonate
a tiny drop of potassium carbonate & sodium bi-carbonate solution a.k.a. kan sui
3tsp water
1tbsp lard/shortening
5tbsp pau flour
4tbsp wheat starch

Directions

char siew pau
- first prepare starter dough by mixing 8oz pau flour with 1tsp instant yeast, 1tbsp fine granulated sugar and 1/2 cup water for a start. Adjust water little at a time until a slightly wet dough is achieved. Cover with plastic wrap and prick a few holes on the wrap and leave dough to ferment until foamy and yeasty
- weigh 4oz of starter dough and add in 2oz sugar. mix these together until sugar is dissolved
- mix 1/2 tsp baking powder, 1/2 tsp ammonium bicarbonate, a drop of kan sui with 2 tsp of water. mix to dissolve and add in to starter dough mixture. mix well to combine
- add in 5 tbsp pau flour and 4tbsp wheat starch and knead to a soft dough (a little more water might be needed as it depends on how wet the starter dough is)
- add in 1tbsp lard/shortening and knead well. Flatten dough and spread it out
- dissolve 1/2 tsp double action baking powder with 1tsp water, rub this all over the spreaded out dough
- fold the dough in and knead well so that all the baking powder is well spread
- dough is ready to be divided into 8-10 portions depending on how big a pau/bao you want
- flatten one portion and put 1tsp of char siew filling. pick up edges and wrap up the filling, making sure there is more dough on top. it will ensure smiling blossom
- you do not need to pleat. just ensure that the edges are well sealed
- place filled pau/bao on top of a piece of parchment paper and put into steamer and cover with a damp cloth. continue to fill up the other portions
- bring water and 1tbsp vinegar to steamer to high boil
- spray baos with water lightly. Do not drown them and put to steam for 12 mins. Ensure that water is on boiling high and do seal the edges of the cover with wet towels to seal in the heat. the hotter the steam, the better the SMILE
- when paus/baos are ready, remove from steamer and allow to cool. do not serve them as the smell of the ammonium bicarbonate has not dissipate
- before serving, steam the paus/baos for another 12 mins
Personal notes:
- each of my pau is 35g (dough) and i pleated my pau as i was practising…
- you will get alot of velvety sauce, so feel free to half the recipe but the sauce is awesome
- i steamed my paus in the steamer with boiling water and steamed them for 5 mins
- velvety sauce and starter dough were prepared one day in advance. starter dough was left to ferment for 12 hours. char siew was marinated night before but prepared on day on making pau
these are really lovely paus…. if you like to see that “hmmmmmmmm” look on your family members face, go for it….

Tianjin Goubuli Steamed Bun 天津狗不理包子


Tianjin Goubuli Steamed Bun 天津狗不理包子
Ingredients (makes about 40 buns)

Dough
Sourdough 老酵 (A)
50g low protein flour
1/4 tsp salt
1 tsp sugar
1 tsp instant dry yeast
50ml water
Starter dough 酵面 (B)
All 100g of (A)
300g low protein flour
100g water
Main dough (C)
All 450g of starter dough (B)
150g caster sugar
1 tbsp double action baking powder
1/4 tsp baking soda
30ml water (if you intend to use up the entire 500g of starter dough, you can omit the water here)
250g low protein flour
50g wheat starch (澄粉)
25g oil (or lard or shortening)
IMG_6398Filling
500g minced pork (portion of fats to lean meat is 3:7)
55g chopped onion
50ml light soya sauce
15ml dark soya sauce
5g MSG (omit if you don’t like this, or replace with chicken bouillon powder)
60ml sesame oil
salt (as appropriate)
ginger water (生姜水)(prepare about 80ml ~ you will not use all. just dice some ginger and boil this in water and cool)
bone stock (骨头上汤)
Directions
IMG_6396- prepare starter dough 2 days in advance (i.e. if you are making these buns on Wednesday, you should prepare sourdough on Monday)
- mix all sourdough ingredients together and cover. allow it to rise for 16-24 hours (do not wrap too tightly so that there is a small inlet of air for the dough)
- next day, add together all ingredients from (B). knead into dough, and cover. let it rise for 16-24 hours. once again do not cover too tightly
- day 3: add in 150g caster sugar to 450g of starter dough. Knead till all sugar has dissolved
- add in baking soda and 30ml water and knead well
- sift flours together with baking powder and add to the above. then add oil.
- knead for 20 mins or until you get a non sticky and shiny dough
- cover dough and allow it to rest for 25 mins
- meantime, prepare filling. mince pork but they should differ in different dice sizes (i.e. some rough, some small). stir the meat in a bowl with a pair of chopsticks, and add in ginger water a little at a time. make sure you do not add too much that it becomes watery
- add in soya sauces a little at a time. once again, soya sauces should be added in a few additions, and very slow. the purpose of this is to ensure all the seasoning is absorbed by the meat. at this point, chill your meat for a while, maybe 30 mins. if you have a meat processor, you need not chill the meat in the fridge
- remove minced meat from fridge, and add in bone stock very slowly. once again, you need to do this in a few additions so the minced meat absorbs the stock. lastly add in MSG, onion and sesame oil (either to instructions or to personal preference)
- set filling aside and divide dough into portions ranging from 18.75g – 20g per dough
IMG_6387flatten each portion of the dough and roll it out into a disc.
the trick to do this is to hold the dough on one hand, and then turning it anti-clockwise as you roll the dough (concentrating on the circumference) out with an upwards, downwards motion with the pin. this will help to result in a thicker centre, and thinner circumference of the dough
picshow20140305_104008each disc should be 8.5 cm in diameter
IMG_6388place about 15g of filling into each dough…keep pushing your filling in with one hand as you pleat the dough with the other
pleat the dough with 15-16 pleats, ensuring you pinch the top dough as you fold each pleat
IMG_6393

Super SoftBread

Super SoftBread

Starter dough
210g bread flour
90g cake flour
24g caster sugar
6g instant dry yeast
240g water
Main dough
210g bread flour
90g cake flour
96g caster sugar
1 1/2 tsp salt
24g milk powder
90g egg
54g water
72g unsalted butter, softened
Directions
IMG_5882

- prepare a pan with base measuring 26.5 x 19.5cm, and top measuring 29.5 x 23cm. if you do not have this, you can use an 18cm square cake pan for this but utilising only 2/3 of the above recipe
- mix all starter dough ingredients dough together and allow to sit in a warm environment to rise till it looks like “honeycomb”
- mix the above with main dough ingredients except butter and knead till it is soft and non-sticky. incorporate butter and knead till it is shiny and pliable
- allow dough to rise till it doubles in size
- after dough has risen, punch dough down and WITHOUT RESTING dough, divide it into 6 equal portions and roll each portion out into a 1m rope. please refer to the same site for shaping of the dough. for non chinese reading bloggers, basically, what you do after rolling out the rope, is to bring one end to the other. then using your left hand to secure the dough, twist the roll inwards twice, and then tuck it (the right ends) into the left side of the dough (where the hole is)
- place shaped buns into oiled baking pan and allow to rise
- bake in preheated oven of 180 degrees C on lower rack for 30 mins
- once out of oven, brush rolls with melted butter


Personal notes:
IMG_5880

- i prepared the starter dough a day in advance and placed it in the fridge before using. no particular reason
- i halved the recipe and made 4 buns in an 18cm square cake pan. the rest of the dough were shaped individually
- my buns are lighter in shade because i omitted the egg… ok ok… i forgot about the egg (。・・。)… but no, this did not alter the texture
- i used caster sugar in the starter dough and trehalose in the main dough… the bread turn out to be mildly sweet
- buns were baked for 32 mins before it reached 96 degrees C
IMG_5888
IMG_5879

Steamed Pork Buns (菜肉包)

Steamed Pork Buns (菜肉包)


Steamed Pork Buns01

This recipe of steamed buns comes late, a bit behind my original schedule. These pork buns were cooked last week and posted on my Chinese food blog a few days ago.

Over the past few days, south-east Queensland has experienced a very devastating flood, so called “inland tsunami”, similar to 1974 tragedy. The family was spared as we are not in the flood zone. Sadly, countless suburbs, the CBD of Brisbane and Ipswich are inundated, awaiting for clean up once the flood waters are clear. My mind was totally occupied by all those images and news about the flood through the media. It’s so sad to see many people lost their houses, their business, their property and even their loved ones. I’ve ever seen such a horrible flash flood since I moved to Australia. Hope I won’t see any again. My thoughts and hearts are out to all those affected in this traumatic flood.

The flood came so quickly, much quicker than anyone expected. So, be thankful and enjoy what you have right now. Even if it’s something as simple as eating a few buns, it's a bliss by itself. Speaking about the buns, they can be kept in freezer for up to two to three weeks once they are steamed and cooled down. I usually take one or two out form the freezer, needless to defrost, and quickly bring their softness and freshness back by steaming in a wok/steamer for breakfasts.

Steamed Pork Buns (菜肉包) (Printable recipe)

Prepare 10 6cmx6cm baking paper/wax paper

Ingredients:
  • 200 gm plain flour
  • 2 tsp caster sugar
  • 1 tsp vegetable oil
  • ½ tsp instant dry yeast
  • 1/3 cup water
  • 1/3 cup, warm milk (should be under 40C)
  • a pinch salt
Fillings:
  • 130 gm Taiwanese cabbage (or other vegetables you like), shredded
  • 170 gm pork mince
Seasonings:
  • 1 Tbsp light soy sauce
  • ½ tsp freshly grated ginger
  • ½ tsp sugar
  • ½ tsp chicken powder
  • ½ tsp salt
  • 3 Tbsp water
  • pepper, to taste

Steamed Pork Buns Procedures

Method:
  1. Mix pork with seasonings well. Chill in fridge for about 15 to 20 minutes. Combine pork with cabbage. Set aside.
  2. Use a measure cup or a bowl, pour in milk. Add ½ teaspoon of sugar and yeast. Rest for about 5 to 10, until bubbles arise.
  3. Combine flour, 1½ teaspoon of sugar, water, oil and yeast mixture, knead into a smooth dough.
  4. Place the dough in a bowl, covered with a cling film. Let rest for 15 to 20 minutes.
  5. Transfer the dough onto a clean surface. Cut into 10 equal portions. Shape each in round balls, then roll into a disc with a rolling pin, with edges thinner than the middle. Wrap a spoonful filling inside, pinch seam tightly. Place on a piece of baking paper. Repeat this step with the rest of the dough. Transfer to a steamer/wok, covered, let rest for about 15 to 20 minutes.
  6. Add cold water into steamer/wok. Steam buns over medium-high heat. When steam is vigorously releasing, continue to steam for 12 minutes. Turn off the heat, let rest for 10 to 15 minutes. Serve hot.

Steamed Pork Buns02

Notes:
  • You can substitute with other vegetables, like baby bok choy, chive, or any vegetables you like.
  • The buns you steamed might look a bit yellowish if you use ordinary flour. Except you use the bleached flour, then your buns would look as white as those bought from shops. But I used the ordinary, unbleached flour, and made it whiter by adding some milk in the process of making the dough. So the buns shown in this post were quite white. If you use only milk without any water to make buns, they’d look even whiter. As I don’t want these Chinese buns taste heavy milk flavour, I just incorporated water to milk, with a ratio of 1:1. You can adjust the ratio according to your preference. You can skip the milk if you don’t like, of course. Just replace it with the same amount of water. That’s easy.


Pan-fried Pork Buns (Shengjian Bao 生煎包)

Pan-fried Pork Buns (Shengjian Bao 生煎包)


Pan Fried Pork Buns

Wondering if these are steamed buns, not pan-fried buns? They are pan-fried buns (also known as shengjianbao 生煎包). Not joking, it’s real.

Back then when I was up to make these buns and planned to post the recipe on my Chinese food blog, just in time I remembered that some fans had asked me how to wrap and pleat a bun. So I took a video while I did the pleating of a bun. Then I cooked the buns in a frying pan instead of a steamer.

The shengjianbao I tried before in a shanghainese restaurant were round and flat without any pleatings, that looked quite different from mine posted here. Since then, I’ve seen more and more of these pleated buns being served in restaurants. The buns are lined up in a nice and hot oily pan and cooked until the bottoms are very crispy. You might also like to sprinkle some finely chopped spring onions and white sesame seeds on top for garnish. That will make your buns look more attractive.

The texture of these buns is soft and fluffy with a crispy bottom. I like to dip them in some soy sauce with black rice vinegar, whereas my husband likes to have them with extra chilli sauce. Whichever sauce you try, it won’t let you down. The buns taste very delicious on their own though.

Pan-fried Pork Buns (Shengjian Bao) Recipe (Printable recipe)
By Christine's Recipes
Prep time: 15 mins
Cook time: 60 mins
Yield: 8 to 10 buns

Ingredients:
  • 200 gm plain flour
  • 110 gm water
  • ½ tsp instant dry yeast
  • 1½ tsp sugar
  • 1 tsp oil
Fillings:
  • 200 gm pork mince
  • 100 gm chives, finely chopped
Seasonings:
  • 1 Tbsp light soy sauce
  • ½ tsp sugar
  • 1 tsp corn flour / corn starch
  • ½ tsp chicken powder
  • 2 tsp water
  • pepper, to taste
  • salt, to taste
Pan Fried Bun Procedures

Method:
  1. To prepare the fillings: Mix the pork mince with the seasonings. Stir towards only one direction. Add chives. Cover and chill in fridge for about 30 minutes.
  2. In a large mixing bowl, pour in water. Mix in yeast. Add sugar, salt and oil. Sift in flour. Use a spatula to combine all the ingredients. Knead into a smooth dough and the surface is not sticky. Transfer into a greased bowl, covered. Rest for 10 minutes.
  3. Transfer the dough onto a clean surface. Roll it into a long tube. Cut into 8 to 10 equal portions. Roll each portion into a ball shape. Flatten with your palm and roll each into a disc with a rolling pin. Wrap a spoonful filling inside, pinch the seam as the video shown below. Repeat this step to finish all the remaining dough disc. Cover and rest at room temperature for 10 minutes.
  4. Heat oil in a non-stick frying pan over medium-high heat. Place the buns in one single layer. Fry them for about 2 to 3 minutes. Pour in boiling water, up to 1½cm in depth. (Remark: Cook in batches if your pan is not large enough.) Cover and cook until the water starts to dry up. Remove the lid and continue to cook until the bottom of buns are golden brown. Serve immediately.


Japanese Style Coconut Custard Buns

Japanese Style Coconut Custard Buns

Prepare a round baking tray 20.5cmx6cm (8inchx2.5inch)

Ingredients of buns:

  • 350 gm bread flour
  • 55 gm caster sugar
  • 5 gm salt
  • 56 gm egg
  • 7 gm milk powder (to increase fragrance, optional)
  • 125 ml milk
  • 120 gm tangzhong (refer to this recipe for making tanzhong)
  • 5 to 6 gm instant yeast
  • 30 gm butter (cut into small pieces, softened at room temperature)
Ingredients of fillings:

  • 30 gm butter, softened
  • 30 gm caster sugar
  • 30 gm egg, whisked
  • 60 gm desiccated coconut
Syrup (optional):

  • 1 tsp sugar
  • 2 tsp water

Coconut Custard Buns Procedures01

Method of making fillings:

  1. Combine softened butter with sugar.
  2. Add egg, stir well, then followed by desiccated coconut. Combine all ingredients well. You can make the filling while waiting for the 2nd round of proofing completed. Or you might like to prepare in advance, cut into 6 equal portions, place in fridge until you need it. If they are chilled too long, place them in room temperature for a while before use. That would be much easier to handle.

Coconut Custard Buns Procedures02
Method of making buns:

  1. Please refer to the previous recipe to make dough with tangzhong (step 1 to 3). After completing the 1st round of proofing, double in size, transfer dough to a clean floured surface.
  2. Deflate and divide the dough into six equal portions. Knead into ball shapes. Cover with cling wrap, let rest for 15 minutes.
  3. Roll out each part with a rolling pin into an oval shape. Place custard filling evenly onto the surface of dough. Roll from top to bottom to enclose the filling. Flatten dough with pin. Again, roll from top to bottom. Knead into a ball shape. Repeat this step of rolling and wrapping fillings with the rest of your dough. With seals facing down, place the six balls into a greased baking tray or lined with baking paper, covered with cling wrap or a wet towel. Leave it for the 2nd round of proofing, about 45 to 60 minutes, until double in size.
  4. Brush whisked egg on surface of buns. Sprinkle sesame seeds if you like. Bake in a pre-heated 180C (356F) oven for 35 minutes, or until golden brown. At about 5 minutes before removing from oven, brush syrup on the surface of buns. Transfer onto a wire rack and let cool completely.

Coconut Custard Buns02

The texture is so soft inside, really fluffy:


Coconut Custard Buns03


Hong Kong Style Sausage Rolls

Hong Kong Style Sausage Rolls

Ingredients:

  • 4 to 6 sausages, any kind to your liking
  • 350 gm bread flour
  • 55 gm caster sugar
  • 5 gm salt
  • 56 gm egg
  • 7 gm milk powder (to increase fragrance, optional)
  • 125 ml milk
  • 120 gm tangzhong (refer to this recipe for making tanzhong)
  • 5 to 6 gm instant yeast
  • 30 gm butter (cut into small pieces, softened at room temperature)

Hong Kong Style Sausage Roll Procedures

Method:
  1. Combine all dry ingredients: flour, salt, sugar and instant yeast in a bowl. Make a well in the center. Whisk and combine all wet ingredients: milk, egg and tangzhong, then add into the well of the dry ingredients. Knead until you get a dough shape and gluten has developed, then knead in the butter. Mind you, it’d be quite messy at this stage (That's why I used a bread maker). Keep kneading until the dough is smooth, not sticky and elastic. (Tip: you might like to test if the dough is ready. Stretch the dough with two hands. If it forms a thin “membrane” that’s very elastic in texture. Use a finger to poke a hole. If the hole is a circle, not an irregular tear-off (see picture 1). That means you have successfully kneaded the dough to a perfect stage. Yet, don’t over-knead the dough. Otherwise all the tissues inside would be broken apart.) The time of kneading all depends on how hard and fast you knead. (Note: I use bread maker to do this hardest part and messy job for me. I added the wet ingredients into my bread maker first, then followed by the dry ingredients. The yeast is the last to add.)
  2. Knead the dough into a ball shape. Place in a greased bowl and cover with a wet towel or cling wrap. Let it proof till it's doubled in size, about 40 minutes (Note: the time will vary and depends on the weather. The best temperature for proofing is 28C. I still used my bread maker in this stage. And my bread maker has a heater.)
  3. Transfer to a clean floured surface. Deflate and divide the dough into four to six equal portions. Knead into ball shapes. Cover with cling wrap, let rest for 15 minutes (see picture 2).
  4. Knead each part into a long tube, about 41cm in length (it depends on how long your sausage). Roll to enclose the sausage, with seals facing down (see picture 3). Place rolls on a tray lined with baking paper, covered with cling wrap or a wet towel. Leave it for the 2nd round of proofing, about 45 to 60 minutes, until double in size.
  5. Brush whisked egg on surface of rolls. Bake in a pre-heated 180C (356F) oven for 35 minutes, or until golden brown. Transfer onto a wire rack and let cool completely.

Hong Kong Style Sausage Rolls02

Notes:
  • This bread can be made with or without a bread maker.
  • Testing your dough before proofing is quite important to make sure you’ll enjoy soft and fluffy bread after baking.
  • The time of proofing has to be long enough, yet not to over-do, in order to get the best result.


Japanese Style Bacon and Cheese Bread (Tangzhong Method 湯種法)


Japanese Style Bacon and Cheese Bread (Tangzhong Method 湯種法)


Why does tangzhong 湯種 (flour paste) work so amazingly that can produce fluffy bread and stay soft for many days? At 65°C, the gluten in the flour and water mixture would absorb the moisture and become leavened. When tangzhonog is added into other ingredients of the bread, the bread dough will be heightened and produces softer bread.

Bacon and Cheese Bread

Prepare a 10.5cm(W)x 20.5cm(L) x10cm(H) loaf tin

Ingredients of tangzhong (湯種 The amount is enough to make two loafs):
  • 50gm/ 1/3 cup bread flour
  • 250ml/ 1cup water (could be replaced by milk, or 50/50 water and milk)
Ingredients of bread:
  • 350gm/ 2½ cups bread flour
  • 55gm/3tbsp+2tsp caster sugar
  • 5gm/1tsp salt
  • 56gm egg (equals to 1 large egg)
  • 7gm/1tbsp+1tsp milk powder (to increase fragrance, optional)
  • 125ml/ ½cup milk
  • 120gm tangzhong (use half of the tangzhong you make from above)
  • 5 to 6gm/2 tsp instant yeast
  • 30gm/3tbsp butter (cut into small pieces, softened at room temperature)
Fillings:
  • bacon, to taste
  • cheese, to taste
Method of making tangzhong:
  1. Mix flour in water well without any lumps. Cook over medium-low heat, stirring consistently with a wooden spoon, whisk or spatula to prevent burning and sticking while you cook along the way.
  2. The mixture becomes thicker and thicker. Once you notice some “lines” appear in the mixture for every stir you make with the spoon. It’s done. You get the tangzhong. (Some people might like to use a thermometer to check the temperature. After a few trials, I found this simple method works every time.) Remove from heat.
  3. Transfer into a clean bowl. Cover with a cling wrap sticking onto the surface of tangzhong to prevent from drying up. Let cool. The tangzhong can be used straight away once it cools down to room temperature. Just measure out the amount you need. The leftover tangzhong can be stored in fridge up to a few days as long as it doesn't turn grey. If so, you need to discard and cook some more. (Note: The chilled tangzhong should return to room temperature before adding into other ingredients. )
湯種 Tangzhong

Method of making bread:
  1. Combine all dry ingredients: flour, salt, sugar and instant yeast in a bowl. Make a well in the center. Whisk and combine all wet ingredients: milk, egg and tangzhong, then add into the well of the dry ingredients. Knead until you get a dough shape and gluten has developed, then knead in the butter. Mind you, it’d be quite messy at this stage (That's why I used a bread maker). Keep kneading until the dough is smooth, not sticky and elastic. To test if the dough is ready, you might stretch the dough. If it forms a thin “membrane”, it’s done. The time of kneading all depends on how hard and fast you knead. (Note: I use bread maker to do this hardest part and messy job for me. I added the wet ingredients into my bread maker first, then followed by the dry ingredients. The yeast is the last to add.)
  2. Knead the dough into a ball shape. Place in a greased bowl and cover with a wet towel or cling wrap. Let it proof till it's doubled in size, about 40 minutes (Note: the time will vary and depends on the weather. The best temperature for proofing is 28C. I still used my bread maker in this stage. And my bread maker has a heater.)
  3. Transfer to a clean floured surface. Deflate and divide the dough into four equal portions. Knead into ball shapes. Cover with cling wrap, let rest for 15 minutes.
  4. Roll out each portion of the dough with a rolling pin into an oval shape. Sprinkle bacon and cheese evenly as much as you like. Roll from the upper, shorter end down to the bottom (as picture shown). Flatten the dough with your rolling pin. Then roll once again. The seals face down.
  5. Arrange the rolled-up dough in a greased or non-stick loaf tin (as picture shown). Leave it for the 2nd round of proofing, about 40 minutes, or until the dough rises up to 3/4 of the height of the tin inside.
  6. Brush whisked egg on surface. Bake in a pre-heated 180C (356F) oven for 35 to 40 minutes. Remove from the oven and tin. Transfer onto a wire rack and let cool completely. Slice to serve or place in an airtight plastic bag or container once it's thoroughly cooled.
Bacon and Cheese Bread Procedures
Notes:
  1. If you find yourself too tired of kneading dough, just like me, you can use a bread maker instead. This recipe is designed for bread makers, yet you can make a soft and fluffy loaf with or without it, by using the tangzhong.
  2. The cheese would be melted and created some holes inside the bread. If you’d like a better looking, cut the cheese into smaller pieces.
Raisin Bread
This is the raisin bread I made with the same recipe. Just replaced the bacon and cheese with raisin.


Sunday, April 20, 2014

Durian Cream Puffs

Durian Cream Puffs

Makes 15 puffs
  • 80 ml (1/3 cup) water
  • 40 g (2 tbsp +1 tsp) butter, at room temperature, cubed
  • 50 g (1/3 cup) plain flour, sifted
  • 2 eggs, at room temperature
  • 125 ml (1/2 cup) of non-dairy whipping cream
  • 125 ml (1/2 cup) of durian pulp
  • 5 g (3 1/2 tbsp) of gelatin powder
  • 1/2 tbsp hot water to dissolve gelatin powder
1. Preheat oven to 385 F (195 C)

2. Place water and butter in a saucepan over medium heat. Cook, stirring, for 3-4 minutes or until butter melts and mixture just comes to the boil.

3. Add all the flour to the butter mixture and stir until well combined. Place over low heat and cook, stirring, for 1-2 minutes or until the mixture forms a ball and begins to come away from the side of the saucepan. Set aside for 5 minutes to cool slightly.

4. Whisk 1 egg in a small bowl and set aside.

5. Whisk the remaining egg and add it to the flour mixture, beating well with a wooden spoon. Gradually add a little of the reserved egg and beat until the mixture just falls from the spoon but still holds its shape.

6. Lightly brush a baking tray with oil. Spoon 15-16 heaping spoonfuls of the mixture onto the tray, about 1-2 inches (3 cm) apart. Alternatively, use a pastry bag fitted with a 1.5 cm-diameter plain piping nozzle to pipe the pastries onto the baking tray. Bake for 15 minutes or until puffed and golden.

7. Remove from oven. Using a skewer or a small knife, pierce the base (or top) of each puff to release the steam. Return the puffs to the oven and leave them for 5 minutes to dry out.

8. Remove from oven and transfer to a wire rack to cool.

9. Whip whipping cream to a soft peak. Add in durian pulp and melted gelatin powder and mix well.

10. Put fillings in a piping bag and pipe it out into the baked pastry. If you like, you can jsut spoon the fillings into the pastry too. Dust the top of the pastry with some snow poder and leave it in fridge to chill before serving.
- See more at: http://www.yearofthedurian.com/2012/08/recipe-durian-cream-puff.html#.dpuf

Spiral Curry Puff

Spiral Curry Puff
*makes 15 curry puffs
recipe source: pastry adapted from Jane's corner, folding method adapted from this video, and my own style of potato and chiken filling

Potato and chicken filling

250g potato, diced
150g chicken, diced
1tbsp chili paste
2tbsp meat curry powder
1 big onion, chopped
3 sprigs curry leaves
1tsp salt or to taste
1tsp sugar or to taste
1tsp light soy sauce

Method
1. Heat oil in wok, sauté chopped onions until aroma
2. Mix in chili paste, curry leaves and curry powder till fragrant.
3. Add in diced chicken and potatoes, mix well.
4. Add in some water and simmer for 10-15min, season with salt, sugar and light soy sauce, cook until potato tender and mixture is dry.
5. Dish out to cool.

Pastry

Water dough
Spiral Curry Puff200g all purpose flour
90-100g water
3tbsp cooking oil
1/2tsp salt
25g caster sugar

1. Mix all dry ingredients in a mixing bowl.
2. Slowly pour in water and lightly knead till a soft dough.
3. Cover and set aside to rest for 20mins.

Oil dough
90g all purpose flour
45g Crisco shortening ( i reduced from original recipe 70g as i found it was too sticky to be handled)

1. Put flour in a mixing bowl.
2. Rub in shortening and slowly combine to a soft dough.
3. Cover and set aside to rest for 15mins.

To make spiral skin
1. Flatten the water dough and wrap the oil dough inside. Pinch the edges to seal it nicely.
2. Dust some flour on a work surface, gently roll the dough out into a rectangle.
3. Fold the rectangle from one long end by 1/3, and fold the other one long end over the top.
4. Rotate the dough 90 degree, gently roll the dough into rectangle again and repeat the folding process twice more.
5. Once the dough has been rolled and folded 3 times, slowly roll up tightly into a Swiss roll (apply some water on the dough while rolling) and rest for 20mins.
6. Use a sharp knife, divide the dough into 15 pieces of small dough (about 30g each).


To fill and shape puff
1. Take a small dough (spiral side face up) and use a small rolling pin to roll to a circle disc.
2. Put 1tbsp of filling in the centre, press the edge together and seal it.
3. Pinch the edge of the puff with your thumb and make plait on the edge.
4. Heat oil in a wok or deep fryer, oil must be very hot before putting in the puff and enough to cover to the puff.
5. Deep fry the puff on medium heat until golden brown.

The process of making pastry

Picnik collage


Picnik collage


Spiral Curry Puff


I believe more practices making nice curry puff, i'm proud to see this beautiful plait,,


Spiral Curry Puff


Spiral Curry Puff


I found the curry puff deep fry in a deep fryer get nicer colour and more crunchy. This was a batch that using wok to deep fry, the middle part tend to brown faster than other parts..

Spiral Curry Puff