This is my private collection of all the food I like from the Blog. Icopy and paste from all the blog that I come across o the food that I like. Hope to make it my own small recipe collection on all the food that is my favourite.
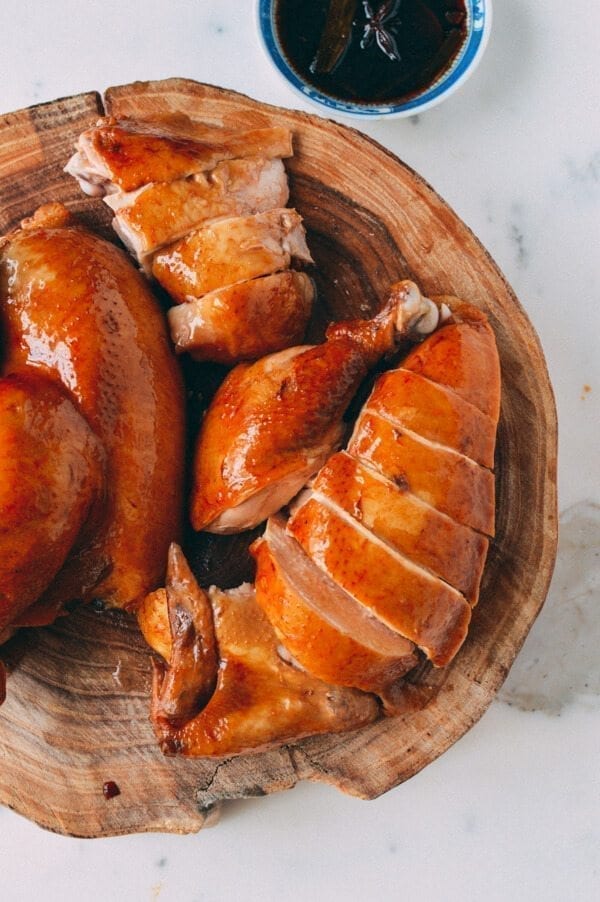
Soy Sauce Chicken or “See Yao Gai” is a quintessential Cantonese favorite, found hanging under heat lamps in many Chinatown restaurant windows. You’ll find it near the poached chickens, roast ducks, and roast pork. All have their merits, but a Soy Sauce Chicken done right is tough to beat.
It’s Judy’s favorite food to pick up when in Chinatown, and there is just something about the flavor of this chicken that makes it so satisfying and tasty each time we get it. These days, a 4 to 5 pound soy sauce chicken runs about 23 bucks, which is totally worth it, but also more reason to make it at home.
The cooking method for soy sauce chicken is similar to the one used in our Cantonese Poached Chicken w/ Ginger Scallion Oil (bai qie ji), recipe, but the similarities end there. Stewed soy sauce, aromatics and spices are the essence of this dish. After you make it once or twice, you can feel free to adjust the amounts of sauces and spices to your own taste. It took me a few tries to get the right ratio of ingredients!
Take your chicken out of the refrigerator an hour before you plan to cook. You’ll want it at room temperature when it hits the pot. Remove the giblets, and thoroughly rinse the chicken inside and out.
Grab your stock pot. It will ideally be a tall, narrow pot that will just fit the chicken, since it should be totally submerged in the cooking liquid (if you use a larger pot, you’ll need to increase all the ingredients proportionally to create more cooking liquid). Put it over medium low heat, and add the oil and ginger.
Let the ginger caramelize for about 30 seconds. Then add the scallions and cook another 30 seconds.
Add the star anise and rice wine, and bring to a simmer to let the alcohol cook off. Add the soy sauce, dark soy sauce, sugar, salt, and water. Bring to a simmer again and cook on low heat for another 20 minutes.
Increase the heat to bring the liquid to a slow boil (i.e. a little stronger than a simmer, but not a rolling boil). Use a large roasting fork inserted into the chicken cavity to lower the chicken slowly into the pot breast side up. Make sure any air pockets in the cavity fill up completely with liquid. The chicken should be entirely submerged at this point.
Once the chicken goes in, the cooking liquid will cool down. Let it cook for about 5 minutes at medium high heat. Next, use your large fork to carefully lift the chicken out of the water and empty the liquid inside the cavity, which will be cooler than the liquid surrounding the chicken. Lower the chicken back into the pot, making sure once again that there aren’t any air pockets in the cavity. If the chicken is not completely submerged, periodically baste the exposed area with cooking liquid.
Bring the liquid back up to a lazy simmer, which should take about 10 minutes. Keep it at this slow simmer (the liquid will be about 210 degrees F) for 25 minutes. Turn off the heat, cover the pot, and let the chicken sit in the pot for another 15 minutes. Transfer the chicken to a cutting board. If you like, you can use a meat thermometer in the thickest part of the thigh to confirm it’s reached 165 degrees F.
Use the sauce from the pot to occasionally baste the chicken and keep the skin moist as it cools. Serve over rice with some sauce from the pot!
We didn’t show it here but some folks like to have this chicken with Scallion Ginger oil from our Cantonese Poached Chicken recipe but personally, I like the purity of the stewed soy sauce for this chicken,
Note: You can also make this recipe with chicken leg quarters and reduce the cooking time accordingly, since they are easier to handle and faster to cook. Also, once you’re done cooking the chicken, you can actually freeze the sauce/cooking liquid for use again later (though you may have to re-season the sauce).
Ingredients
1 whole chicken, about 4 pounds (preferably free-range, never frozen)
2 teaspoons oil
7 slices ginger
2 scallions, cut into 3-inch pieces and smashed flat
3 whole star anise
1 ½ cups rose-flavored rice wine (mei kwei lu) or shaoxing wine
1 ½ cups soy sauce
1¼ cup dark soy sauce
1 cup sugar, plus 2 tablespoons
2 teaspoons salt
10 cups water
Take your chicken out of the refrigerator an hour before you plan to cook. You'll want it at room temperature when it hits the pot. Remove the giblets, and thoroughly rinse the chicken inside and out.
Grab your stock pot. It will ideally be a tall, narrow pot that will just fit the chicken, since it should be totally submerged in the cooking liquid (if you use a larger pot, you'll need to increase all the ingredients proportionally to create more cooking liquid). Put it over medium low heat, and add the oil and ginger.
Let the ginger caramelize for about 30 seconds. Then add the scallions and cook another 30 seconds. Add the star anise and rice wine, and bring to a simmer to let the alcohol cook off. Add the soy sauce, dark soy sauce, sugar, salt, and water. Bring to a simmer again and cook on low heat for another 20 minutes.
Increase the heat to bring the liquid to a slow boil (i.e. a little stronger than a simmer, but not a rolling boil). Use a large roasting fork inserted into the chicken cavity to lower the chicken slowly into the pot breast side up. Make sure any air pockets in the cavity fill up completely with liquid. The chicken should be entirely submerged at this point.
Once the chicken goes in, the cooking liquid will cool down. Let it cook for about 5 minutes at medium high heat. Next, use your large fork to carefully lift the chicken out of the water and empty the liquid inside the cavity, which will be cooler than the liquid surrounding the chicken. Lower the chicken back into the pot, making sure once again that there aren't any air pockets in the cavity. If the chicken is not completely submerged, periodically baste the exposed area with cooking liquid.
Bring the liquid back up to a lazy simmer, which should take about 10 minutes. Keep it at this slow simmer (the liquid will be about 210 degrees F) for 25 minutes. Turn off the heat, cover the pot, and let the chicken sit in the pot for another 15 minutes. Transfer the chicken to a cutting board. If you like, you can use a meat thermometer in the thickest part of the thigh to confirm it's reached 165 degrees F.
Use the sauce from the pot to occasionally baste the chicken and keep the skin moist as it cools. Serve over rice with some sauce from the pot!
Note: You can also make this recipe with chicken leg quarters and reduce the cooking time accordingly, since they are easier to handle and faster to cook. Also, once you're done cooking the chicken, you can actually freeze the sauce/cooking liquid for use again later (though you may have to re-season the sauce).
The kneaded rolls stay a wee bit more moist for longer. ie. they are slightly better the next day compared to the No Knead ones. But actually, homemade bread, muffins etc, being preservative free that they are, are always best consumed fresh so I don’t see this as a major disadvantage. Neither the kneaded nor No Knead rolls are great the next day. They lose their moisture and both need to be warmed up before serving to make them moist again. It is just that with the kneaded ones you could possibly get away with not warming up (but they aren’t great), whereas the No Knead ones definitely need warming up;
Kneaded rolls rise a wee bit more. Not noticeable for normal people, and you’d never say the No Knead ones aren’t soft and fluffy. They are, they really are. It’s just that the kneaded ones rise a touch more with the same amount of yeast.
In terms of the prep, the batter is literally a dump-and-mix job. There is a major difference in rise time compared to kneaded dough which can rise in 30 – 45 minutes for the 1st rise, then around the same for the 2nd rise after forming the rolls. For these No Knead Dinner Rolls, the dough is much wetter than kneaded dough, so it takes longer to rise. 1.5 – 2 hours, depending on how warm it is where you are. If you use my ridiculous-but-effective tip of rising the dough in your (empty! warm!) dryer, it takes 1.5 hours. 🙂 (See recipes notes for details)
You can see in these photos how different the dough is compared to traditional bread dough. It’s not knead-able, it’s way too sticky. It’s almost more like a muffin batter!
Quick little tip: To get a beautiful golden surface, the dough needs to be rolled tightly and smoothly into balls. With sticky dough, this is tough to do. So here’s my work around: Press the dough down lightly, then bundle it up like a money-bag (mmm…Thai Money Bags…). Flip it over and you have a nice smooth surface with the dough stretched tightly = smooth golden surface. 👍🏻 I demo this in the recipe video too (below recipe).
Awesome Make Ahead Tip! Another big bonus for these rolls: you can roll the dough into rolls then refrigerate overnight (uncooked) and bake them fresh when you’re ready to serve! It’s quite amazing actually, I wasn’t sure it would work but it does.
Easter is coming up! That’s why I decided to squeeze these in so soon after sharing Hot Cross Buns (which you can make using this No Knead technique, the recipe is in that post). I know some people think baking with yeast is daunting. But I swear to you, watch the video. See how soft and irresistible these rolls come out. And be prepared to be blown away by how easy these are to make!
SOFT NO KNEAD Dinner Rolls
Prep Time
10mins
Cook Time
15mins
Total Time
25mins
These soft dinner rolls are like magic! Just mix the ingredients in a bowl - no kneading, no stand mixer, no special ingredients required. These are soft, fluffy and moist, nicely salted with a touch of sweet. Definitely not a "sweet" roll. Serve with meals or use for sandwiches! Watch the recipe video below to see just how easy these are to make. NOTE: Requires 3 hours rising time. This makes 12 largish rolls - about the size of a baseball.
55 g / 1/4 cupcaster sugar (superfine sugar), or sub with normal white sugar
1/2 cup / 125 mlwarm water (Note 2)
1 cup / 250 mlmilk, lukewarm, whole or low fat, (Note 2)
600 g/ 4 cupsbread flour + extra for dusting (can use all purpose / plain flour) (Note 3)
1 1/2tspsalt
50 g / 3.5 tbspunsalted butter, melted and cooled
2eggs, at room temperature, beaten with fork
Brushing:
1tbspbutter, melted
Instructions
Place the yeast and 2 teaspoons of the sugar in a medium bowl, then pour in water. Leave for 5 minutes until it froths.
Place flour, remaining sugar and salt in a bowl. Mix to combine.
Make a well in the centre. Add remaining ingredients and pour in the yeast liquid, including all froth.
Mix until combined with wooden spoon - it will be like a thick muffin batter. Not pourable, but thick and sticky.
Rise #1:
Leave dough in the bowl, cover with a wet (clean) tea towel and place in a warm place (25C/77F+) to rise for around 1 1/2 - 2 hours or until almost tripled in volume. See Note 4 for how I do this (you will laugh - but it works every time!). Dough surface should be bubbly (see video or photos in post).
Forming Balls (watch video, it's helpful):
Line a 31.5 x 23.5 cm / 9 x 13" tray with baking paper with overhang.
Remove tea towel and punch dough to deflate, then mix briefly in the bowl to get rid of the bubbles in the dough.
Dust work surface with flour, scrape dough on work surface. Dust top of dough then shape into a log. Cut log into 4 pieces, then cut each piece into 3 pieces (12 in total).
Take one piece and press down with palm, then use your fingers to gather into a ball, flip (so smooth side is up) then roll the dough briefly to form a ball. This stretches the dough on one side and that's how I get a nice smooth surface on my roll.
Place the ball with the smooth side up on the tray. Repeat with remaining dough. Line them up 3 x 4.
Rise # 2:
Spray surface of rolls (or cling wrap) with oil (any), then place cling wrap over the tray.
Return tray to warm place and leave for 30 - 45 min, until the dough has risen by about 75% (less than double in size).
Partway through Rise #2, preheat oven to 200C/390F (standard) or 180C/350F (fan/convection).
Bake for 15 - 18 minutes, or until the surface is a golden brown and the roll in the centre sounds hollow when tapped. The surface colour is the best test for this recipe.
Remove rolls from oven. Brush with melted butter.
Use overhang to lift rolls onto a cooling rack. Allow to cool to warm before serving.
Recipe Notes
1. 1 tbsp dry yeast = 9 grams
I use Lowan Dried Instant Yeast (red tube, sold at Woolies/Coles baking aisle) which technically doesn't need to be frothed before using but there's no harm in doing it, and I do it out of habit + also because then the same steps apply to any dried yeast.
If you are using the packets, you can just use 2 x 7 g sachets, that is 4 1/2 tsp which is slightly more than 1 tablespoon but it works just fine. Doesn't taste yeasty and makes it rise a touch more. Otherwise, measure out 1 tablespoon.
If your yeast doesn't go frothy, sorry to say it's not active so your buns won't rise. 🙁
To use fresh yeast (comes in a block that crumbles, not powder like dry yeast), use 27g/ 0.9 oz. You don't actually need to dissolve it in liquid like I do with the dry, but there's no harm in doing it and so for the sake of consistency, crumble it in and let stand until it foams up, same as using dry yeast.
2. Scalding hot milk and hot water kills the yeast. I heat milk for 45 seconds on high in the microwave, and use warm tap water. The test is this: stick your finger in. If it was a bath, would it be pleasant? Good. It's not too hot or too cold!
3. Breads are fluffier and slightly more tender if made with bread flour rather than normal flour (plain or all purpose). However, this recipe works great with normal white flour too.
4. WARM PLACE for dough: This is what I do all year round - use my dryer. Laugh - but try it! Run the (empty) dryer for 1 - 2 minutes, then place the bowl inside. If you do that, the dough will rise in 1.5 hours. Even if it's snowing outside!
5. SUGAR: This is not a sweet roll (I'd use 1/2 cup+ for that) but there is a touch of sweet. 1/4 cup of sugar across 12 rolls = 1 tsp per roll. You can reduce it to 2 tablespoons of sugar.
6a. MAKE AHEAD: Follow recipe up to rolling balls and cover with cling wrap. Then refrigerate for 4 hours - 24 hours, then bake!
6b. STORING: As with all homemade bread, it is best served on the day it's made. Things made using this No-Knead version doesn't keep as well as the kneaded version - dries out more. For the day after, reheating makes all the difference to make them soft and moist again - 15 sec in the microwave! These freeze great, then just defrost. To reheat batches, I pop them on a tray and cover with foil (to avoid the surface getting too crisp), then reheat at 160C/320F for 8 minutes or so. Or cut in half and toast.
7. This recipe is adapted from various no-knead bread recipes I've come across over the years. I probably first saw it on Martha Stewart or New York Times. The recipe has been tweaked and now I firmly consider this version to be "mine"! 🙂
No Knead Dinner Rolls recipe video! No laughing at the Baby Hands – you’ll cop
Yellow Team 250g Philadelphia cream cheese (1 block) 6 egg yolks 70g castor sugar (This is half of the total 140g) 60g butter (1/4 block) 100 ml full cream milk 1 Tbsp. lemon juice 1 tsp lemon zest (or lemon essence) (optional) 60g cake flour 20g cornflour 1/4 tsp salt 2 tsp Vanilla extract (optional)
White Team 6 egg whites 1/4 tsp cream of tartar 70g castor sugar (This is half of the total 140g)
Here is the breakdown of the procedure for your quick reference:
1. Pre-heat oven to 200°C (Top and bottom heat, no fan force) 2. Spray 8in x 3in cake pan with non-stick spray, line bottom with baking paper 3. Whisk cream cheese till smooth over a warm water bath 4. Add yolks and whisk 5. Add half the sugar (70g) and whisk 6. Warm milk and butter in microwave or stove, whisk into batter 7. Add vanilla, salt, lemon juice, lemon zest and whisk 8. Remove from water bath, sift flour and fold into mixture 9. Whisk whites at low speed till foamy 10. Add cream of tartar and beat at high speed till bubbles become very small but still visible 11. Gradually add sugar and beat till just before soft peaks 12. Fold whites into batter 1/3 at a time 13. Pour into cake pan and tap the pan on the counter to release air bubbles 14. Bake on the bottommost rack in a preheated 200 degree C oven (top and bottom heat, no fan force) for 18min, lower to 160 degree C for 12 mins and turn off the oven and leave cake in the closed oven for 30mins. Open the door of the oven slightly at the end of the baking for 10mins for cake to cool.
The video below outlines all the steps in the procedure.
If you have followed the procedure and have ended up with the perfect cheesecake the first time then CONGRATS! Well done! However, if you find that your cake isn’t as good as it should be then read on!
Trouble Shooting Notes:
The Ingredients
1. Cream Cheese
Since this is a cheesecake, the cream cheese that you use is important not only for the flavour but also for the texture. I have used many different brands of cream cheese and my family and friends can tell when I use a different brand of cheese. Philadelphia cream cheese works perfectly for this recipe and will result in a cake that is light and fluffy with a subtle but distinct flavour which is well liked by my guinea pigs tasters. I once tried a different brand of cream cheese which resulted in my cake splitting every time I bake. It took me a while before I figured it out, but I eventually read that cream cheeses have binders in their formulation. So I postulated that some cream cheeses may have too much binders which will result in a stiffer texture which breaks easily when the cake starts to rise. So make sure you buy a cream cheese which is creamy and soft even when it is cold and not stiff like a sausage (like the one I bought)!
2. Eggs
Eggs come in all sorts of sizes. This recipe is based on 60g eggs. Look for cartons which state that the 10 eggs have a net weight of 600g. Eggs usually have a shelf life of about 1 month. Look for the expiry date and choose the freshest ones. Fresh egg whites will whip up better and taller. I find that it is okay to just use eggs straight out of the fridge. Make sure that when you separate the eggs that you don’t get any yolks in the whites or the whites will not whip up well!
3. Flour
This cake will tend to break if the structure is too strong. That is why you need to use low gluten flour. The gluten is still needed for the cake to rise as they form a stretchable membrane around each air bubble which allow them to expand like little balloons. The starch from the wheat flour as well as the cornstarch helps to delay the coagulation of the egg proteins. Once the egg protein and gluten stiffens, that is when the cake rises rapidly. From my observations, this happens at around 85°C. That is why I timed my oven temperature such that the cake plateaus at an internal temperature of 80°C. If you cannot find cake flour, then you can approximate it by the formula: 1 cup plain flour – 2 Tbsp plain flour + 2 Tbsp cornflour = 1 cup cake flour. But bear in mind that cake flour is bleached, ground more finely and formulated to be able to hold more sugar, so it is still better to use cake flour if you can buy it. Hong Kong Flour, Top Flour and Super Lite Flour should work as well, but NOT Self Rising Flour. Self rising flour has got baking powder in it and will turn your cake into huat kuay!
4. Sugar
You need to use castor sugar, not fine sugar. The sugar crystals in castor sugar is finer than fine grain sugar and is essential for making a good meringue (whipped egg whites). If you don’t have castor sugar at hand, just use your grinder to grind fine sugar into a powder. Don’t use icing sugar as it contains additional cornflour and might mess up your cake!
5. Salt
Salt improves the flavour of anything sweet which is why salted caramel is so nice. It has been shown that salt activates the receptors on the tongue and increases the perception of flavours, so don’t omit it!
Choice of cake pan is important!
6. Cake Pan
Save yourself some heartache and go buy an 8 in wide, 3 in high non-stick light coloured cake pan for your cheesecake. I bought mine at Bake King near Haig Road market. You will notice that I don’t use a springform pan or line the sides with baking paper. I also hate having to line the springform pan with aluminum foil which can still sometimes leak and allow water to seep into the cake. (Yes, it happened to me before). I found that lining the sides with baking paper results in creases around the sides of the cake which is quite ugly. Using a one piece non-stick cake pan is much easier and results in a cake with very nice, straight sides.
Ugly top, creased sides
You need to use a light coloured pan because those black pans will absorb heat easily and cause the sides of your cake to bake faster than the middle. This will cause it to dome and crack. I found that the non-stick, light coloured pan is the way to go. With this pan, the batter will come up to about 1.5 cm from the rim which is just nice as the cake will rise about 2 cm using the oven timing I provided. If you try to bake this at 160°C for 1 hr 10 mins as per most internet recipes, the cake will rise very high and then deflate resulting in an ugly wrinkled top.
Spray the sides of the pan liberally with non-stick spray. If you don’t have non-stick spray at hand, just brush the pan with butter and dust evenly with cornflour. Make sure that you apply the non stick spray thoroughly so that there are no dry spots, especially at the rim of the cake pan. The batter will stick to any spot which is dry and that will stop it from rising. Once that happens the cake will start to dome and the chances of a crack increases. The top should rise up evenly like a souffle.
Perfectly baked Durian Cheesecake
7. Lining the Bottom of the Cake Pan
Line the bottom of the pan with baking paper so that it is easy to de-pan the cake after cooking. You can spray some non stick spray on the bottom so that the paper can stick to it (ironic isn’t it?). Alternatively, you can do what Chef Yamashita does and line the bottom with a 1cm slice of sponge cake! (This requires you to bake a sponge cake!) The sponge is great as it adds an extra dimension of texture as well as act as an insulator for the bottom of the cake! (Good extra step to show that you really put in the effort when you are trying to impress your future mother-in-law or wife)
8. Whisking the Cream Cheese
I found it difficult to get a smooth mixture when I melt the cream cheese together with the milk as most recipes tell you to do. Much easier to place the cream cheese over a warm water bath, cut it into cubes with a pair of scissors, allow it to warm up and whisk. You will find that the cream cheese will melt nicely into a creamy smooth mixture to which you can then add the egg yolks.
9. Folding in the Flour
Make sure you sift the flour to remove any lumps and fold gently just before you add the whites. Don’t be too bothered if it looks a little lumpy, as long as it is relatively smooth, you will be fine. Don’t over mix it as more gluten will form when you mix. More gluten will make the batter stiffer which result in more bubbles, more rise and a broken cake. Fold and mix gently and don’t allow the batter to stand for too long with the flour in the mixture as gluten starts forming when it is wet!
10. Temperature of the batter
The temperature of the batter should be between 40°C to 50°C. It should not be cold, neither should it be too warm as the cake will cook too quickly when it enters the oven. When this happens, the cake will break because the sides cook too quickly before the middle.
11. Whipping the Whites
The Japanese cheesecake is not like a chiffon cake where you want the cake to rise a lot and create lots of bubbles in the structure of the cake. It is light but still creamy and the bubbles remain very tiny. Don’t over whip the whites! If you get to stiff peaks, then your cake will break! I don’t even beat to soft peaks as I want a batter that is easily pourable. Somewhere just past the ribbon stage (the whites will form ribbons as it falls from the whisk) and before soft peaks where you get about 3 inches of whites left on your whisk after you lift the whisk out of the bowl for 2 seconds is just right. I don’t use my counter top mixer as it is too efficient and I often over whip the whites. A handheld beater gives you more control. Don’t forget the cream of tartar. It helps to stabilize the whites even through the baking stage. You are aiming for a meringue which is smooth and silky with a bit of sheen (from the sugar) that is easy to fold into the batter. It should not be lumpy at all. Err on under-whipping rather than over-whipping it as this cake doesn’t need so much air in it.
12. Filling the Cake Pan
Once the whites are mixed into the batter, you should have a batter with the consistency of thick potato soup and very easy to pour. You should not have to level the top with a spatula. It should just flatten out by itself. The batter should come up to 1.5 to 2 cm from the rim of the pan. You need at least 1.5cm for the cake to rise, so if for some reason you have extra batter (like you used 65g eggs because you never follow instructions!), don’t try to save it by overfilling the pan, just throw it away or you will end up with an ugly cake. Make sure you tap the cake pan on the table top sharply to release as many bubbles as possible! Bubbles will rise to the top during the baking and produce cracks!
13. Water Bath
You need to bake this cake in a water bath as the water will absorb the heat and provide a gentle, moist heat to bake the cake. Try to get another pan which is 1/3 larger than your cake pan. No one actually mentions this, but the amount of water you have in the oven actually matters! I found that when I used a big tray of water, it took a longer time for the internal temperature of the oven to rise to the set temperature. This makes sense since the more water you have, the more heat it will absorb! So use a pan which gives you about 5 cm of water all round the cake pan. I also found that it is useful to place a folded towel at the bottom of the pan in order to make sure you have a layer of water beneath the cake pan. You will be baking this cake at the lowest rack, so it is near to the bottom heating element. Placing a towel there will ensure that the temperature at the bottom of the pan never rises above 100°C. You should fill the pan with hot water. It doesn’t have to be direct from the kettle but it shouldn’t be cold. I usually use the water from the double boiler. The water should be about 1 inch high which means that it is 1/3 the height of the cake pan. It is important to have it high enough as it helps to keep the sides of the cake pan at a temperature that is close to 100°C. This prevents the sides of the cake from cooking too quickly which means that it will set before the middle of the cake. When that happens the cake will “dome” and if it domes too much it will crack.
Measuring the internal temperature of the cake as it bakes
14. Baking Times
Most online recipes say that you need to bake the cake at 160°C for 1 hour 10 mins. For my first few cakes, I found that my cake often rises too much and then cracks or deflates resulting in an ugly wrinkly top. I got so frustrated that I decided to put a temperature probe in the cake as well as the oven in order to know what exactly is happening in the oven. What I found was that at 160°C, the temperature of the cake would have risen to 75°C by the 40min mark, by around 50 mins it would be 85°C and the cake will rise exponentially, resulting in a very tall cake which might crack or even if it didn’t, will have a wrinkly top after it cools down. (Just like stretch marks after giving birth). I decided that I should bake this cake such that it rises as little as possible.
Normal whole egg will coagulate at 68°C. With all the other ingredients added, the coagulation temperature is around 80°C. So what we need to do is to come up with a temperature and timing which will bake the cake to an internal temperature of 80°C to 85°C. That would be when the egg proteins just start to coagulate. Stopping the cooking at this temperature should result in a cake which is more tender and moist. It is just like cooking a hard boil egg to 80°C as opposed to 100°C. Overcooked whites turn rubbery. I expect it’s the same when it is in a cake.
If we bake at 160°C, by 40 mins it will have an internal temperature of 75°C and when we turn off the oven, it will continue to rise and plateau at 81°C. But the problem is that the top will look pretty anaemic instead of having that bronzed South American suntan look. That is why I decided to pre-heat the oven to 200°C instead. Once the cake pan and waterbath is placed in the oven the temperature falls to 180°C and remains there for the first 18 mins. By this time the top will be slightly tanned. We then lower the temp to 160°C before the oven temp starts to climb again. By the 30min mark (from the start of baking), the cake would have risen by 1 – 1.5cm and have a nice brown domed top. The internal temperature of the cake at this stage is 75°C. That is when you turn off the oven and allow the residual heat to continue cooking the cake. The internal temperature of the cake should plateau at 81°C and the cake rise by not more than 2 cm before it starts deflating in the oven. By the one hour mark the internal temperature of the oven would have fallen to 110°C. This is when you open the oven door by 10cm (just slightly ajar, you don’t have to measure this!) for 10 mins. The cake would have already shrunken and pulled off the sides and ready to be de-panned.
Every oven is different, so you may have to adjust the timing to suit your own oven. Having an oven thermometer will help. As long as you keep the oven temperature at around 180°C for the first 18 mins and then lower it to 160°C by the end of the 30min mark, your cake should be cooked nicely.
NB: I bake with top and bottom heat, no fan force mode with the cake placed on the lowest rack. It works for my oven. You can try this first and adjust according to your own oven’s performance. An oven thermometer is a very useful instrument to have.
Measuring the internal temperature of the cake as it bakes
15. Drawing the Cartoon
This step is entirely optional, but I think it adds a nice personal touch if you are planning to give the cake as a present. All you need to do is to set aside some extra cake batter and mix it with cocoa powder. I use powder because it helps to thicken the batter so that it is easier to pipe. The dots are easier to do by using a satay stick dipped into the batter. Make sure you sift the cocoa powder to remove any lumps and mix well!
Since the shooting of the video, I have found a better way of drawing the cartoon. Instead of pouring out some batter and setting a side, just pour out the batter into your cake pan. Then instead of scraping the bottom of the mixing bowl, just shift some chocolate powder to whatever is left in the mixing bowl! This accomplishes 2 things. 1. If you did not mix the batter well enough, all the heavier batter will be at the bottom and if you scrape it and add it to the cake pan, it will sink to the bottom, resulting in a dense layer. 2. It is easier to sprinkle and mix the cocoa powder when it is already covering a wide area in the mixing bowl!
Instead of a piping bag, I bought a special silicone piping device which makes it so much easier than a piping bag. I bought mine at Takashimaya but I am sure you can find it at baking supply shops. You could probably do it with an empty squeeze bottle too!
16. De-panning the Cake
If you have done everything right, de-panning should not be a problem. Just make sure you jiggle the cake to loosen it from the sides and de-pan when the cake is still warm and never do it after the cake cools in the fridge as the “skin” becomes damp and sticks to whatever you are using to de-pan it! The baking paper is just an extra guarantee to ensure the top of the cake does not stick to whatever you are using to de-pan the cake. (If the cake is warm, you don’t really need it)
16. Glazing the top of the cake
The cake looks best when it is just out of the oven. It needs to be aged in the fridge for four hours (better overnight) for its flavour to mature. But by that time the top will become wrinkly (It’s just like us humans!). In order to have a cake that looks good, you need to A. Take a photo of it when it is just out of the oven so that you can show the world how great your cake looks before it turns wrinkly, or B. Glaze it before it turns wrinkly.
To glaze you need apricot gel or glazing gel which you can buy from baking supply shops ie Phoon Huat, Bake King etc. Add an equal amount of water to the gel (1:1) and microwave it till it is boiling hot and stir till it becomes a smooth liquid and apply to the top of the cake while it is still warm. It is important to glaze it as soon as you take it out of the oven as the surface needs to be warm or the gel will just set too quickly. If it cools too much, heat the top with a hair-dryer to warm it up before you apply the glaze. Apply the glaze with as wide a brush as you can and do it with as few strokes as possible. (You will only get 2-3 strokes before the gel sets and further brushing will result in a rough surface) You will need at least two coats to give it a nice smooth surface.
17. Variations
Once you have mastered the basic cheese cake, you can then explore adding flavours to it. It can be as simple as using real vanilla pods where you scrape the seeds and add it to the batter during the yellow mixing phase or adding various flavour essences. Lavendar, Earl Grey flavour essences will work well. For a really Singapore version, you can do a Mao Shan Wang Durian Cheesecake! I have done this successfully and it is a hit with durian lovers! The flavour of the durian will fill the room and cause your guests to divide into two groups like the parting of the Red Sea! One group will be right next to your cake while the other will be outside the house! Here is my recipe.
To make the Durian version, simply puree 250g durian flesh with 100ml milk (This is the same 100ml milk in the original recipe, not an additional 100ml) in a blender. Then strain it and add this to the yellow team after you have mixed the yolks with the cream cheese. The rest of the steps are exactly the same. You can reduce the amt of durian if you wish. Up to 250g is quite safe as it has worked for me and results in a cake that is moist, yet light and fluffy with the perfume (stench to some) of durian to polarize your guests!
Conclusion
There you have it! Almost everything you need to know about baking the perfect Japanese Cheesecake! May you not have to go through the same heartaches I had to go through! Do let me know of your successes!